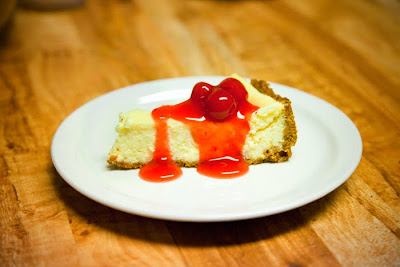
Cheesecake

Cheesecake Supreme
Prep: 30min Bake: 40min Oven: 375 Cool: 2hr Chill: 4hr
Makes: 12-16 servings


What You Need:
1 1/2 cups finely crushed graham crackers
1/4 cup finely chopped walnuts
1 tablespoon sugar
1/2 teaspoon ground cinnamon (optional)
1/2 cup butter, melted
3 8-ounce packages cream cheese, softened
1 cup sugar
2 tablespoon all purpose flour
1 teaspoon vanilla
1/4 cup milk
3 slightly beaten eggs
1/2 teaspoon finely shredded lemon peel (optional)
1 can of cherry pie filling (optional)


What to do:
1. For crust, in a bowl combine graham crackers,
walnuts, 1 T sugar, and, if desired, cinnamon. Stir in
melted butter. Press crumb mixture onto the bottom and
2 inches up the sides of an 8-9 inch springform pan.
Set aside.

2. For filling, in a large mixing bowl beat cream
cheese, the 1 cup of sugar, flour, and vanilla with an
electric mixer until combined. Beat in milk until
smooth. Stir in eggs and, if desired, lemon peel.

3. Pour filling into crust-lined pan. Place pan in a
shallow baking pan. Bake in a 375 degree oven 40 to 45
min for an 8in pan, about 35 min for a 9in pan, or
until a 2 1/2 in area around the outside edge appears
set when gently shaken.

4. Cool in pan on a wire rack for 15 min. Using sharp
small knife, loosen the crust from sides of pan; cool
30 min more. Remove the sides of the pan; cool
cheesecake completely on rack. Cover and chill at
least 4 hours before serving.
Drizzle cherry pie filling on top if desired.


Individual Meat Loaves

This has become my favorite food! I want to make it every day, and I would if I wasn't afraid that Nate would get sick of it. It's so easy and fast to make and doesn't ask for many ingredients. It goes great with potatoes, carrots, and a salad.


Here's what you need:

1 can (5oz) evaporated milk
1 egg, lightly beaten
3/4 cup quick cooking oats
1/4 cup chopped onion
1 tsp salt
1/4 tsp pepper
1 1/2 lbs ground beef
1/3 cup ketchup
1 TBS brown sugar
1 TBS prepared mustard


Here's what you do:

In a bowl, combine the 1st 6 ingredients. (don't be afraid if it looks gross. It'll get better, trust me :) )


Add beef and mix well.


Shape into 6 loaves about 4 in X 2-1/2 in placed in an ungreased 13X9X2 in baking dish.


Combine ketchup, sugar, & mustard; spoon over loaves.


Bake, uncovered at 350 for 35 - 45 min or until meat thermometer reads 160 and no pink remains.


Ta da!!


ENJOY!!!


Spaghetti Bake

Last night for dinner we had spaghetti with my family and had TONS of leftovers. Well, tonight we didn't feel like just regular spaghetti, so Cameron decided he was going to create something, so we made Spaghetti Bake. It was pretty easy and pretty good. Here is what we used:


Pictured above:
-Leftover pasta
-Leftover sauce
-Leftover frozen sausage
-Mozzarella cheese
-Parmesan cheese
-Colby Jack cheese
-Cheddar cheese
-Onion powder
-Garlic salt
-Italian seasoning
-Caesar Vinaigrette Dressing
-Buffalo Wing Sauce
-Lemon Juice (which we did not end up using)
-Canned 4 Cheese spaghetti sauce

You don't have to use all the same sauces and spices as we did, just combine your favorites to get the taste you want. We wanted a little bit of zip in the spaghetti sauce so we added some wing sauce and vinaigrette. This was a "use whatever's in the pantry" meal for us. Also, you don't have to use all the same cheeses...we just wanted something cheesy! We put a little too much cheese in overall, but it wasn't bad.

Here is how we made it:
1. Combine leftover and "new" sauce in sauce pan.
2. Add sausage (or you could do browned hamburger, either one)


3. Add seasonings and sauces

4. Oil a casserole dish so the pasta won't stick.
5. Put a layer of spaghetti in the dish.
6. Add a layer of mozzarella and Parmesan cheeses.
7. Add a layer of sauce.
8. Add a layer of Colby Jack and Cheddar cheeses.
9. Repeat steps 5-8 till pasta and sauce are gone or until dish is full.
10. Bake at 350 degrees for about 10-20 minutes. We like the cheese a little crispy on top, so we left ours in about 20 minutes.


11. Enjoy!

Oreo Truffles

I know, this is from a while back and from my other blog...but I absolutely love this recipe and it's quite easy and you'll love it:

Oreo Truffles

Supplies you will need:
1 pkg oreos (I prefer double stuff)
1 pkg cream cheese
1 pkg chocolate candy coating (I usually use Almond Bark, but the store didn't have any, they just had Kroger Candy Coating, which works, but it doesn't taste as good in my opinion)
1 pkg vanilla (or any white) Candy Coating
2 pots
1 bowl
baking pans
wax paper
4 spoons
2 butterknifes

Step 1: Smash the oreos. I use a cool little blender thing-a-ma-jigger...I can't think of what it's called right now, but it's in the picture below. I've used a ziploc bag and my fist before, but it doesn't work as good.

You don't want there to be any big cookie chunks. You want it to look like potting soil. MMMmm, yummy!

One package of oreos will yield this many crumbs (below).

Step 2: Add the whole block of cream cheese.

I suggest removing any rings or bracelets for this next part.

Step 3: Mix the crumbs and the cream cheese together. I have tried a few different things and have found that using my hands is the most effective way to get this stuff mixed together.

It was after seeing the above shot that I decided I needed to put make up on and brush my hair again...so now my cute little side ponytail is smooth, I have cute dangly earrings on and my makeup is subtle but present. hahaha.
It'll look like this when you're done (below is actually a double batch mixed up).

Step 4: Put the bowl with the goop in the fridge or freezer to harden up a little. Meanwhile, get out a casserole dish or a cookie sheet. After just a minute or two, take the goop back out and then start rolling it into little balls about this big:

When I got my double batch all rolled out, I had 194 oreo balls (but then I ate two, so I ended up with an even 16 dozen...so a single batch will yield about 8 dozen candies...depending on big/small you roll the balls and how many you eat in the process). Once the balls are rolled, stick the pans in the freezer.

Step 5: Melt half of the chocolate in a saucepan (there'll be instructions on the packet if you need them). Once the chocolate is melted, take the balls out of the freezer and plop a few in the pan (I usually do about 3 at a time). As the balls warm up, they will try to come apart, so don't throw too many in the pot at one time.

Cover the ball in chocolate and fish out with a spoon, or whatever device you have chosen for the job.

Dip half of the balls in the chocolate, adding more chocolate to the pot to melt as you go. I used to melt all the chocolate at once, but then it started to get lumpy and not as smooth. I found that it works better to add chocolate as you go, it works better. Once half the balls are dipped in chocolate, set the chocolate pan aside (with any remaining chocolate...you'll use it later).

Step 6: Melt half of the white chocolate in a different pan and dip the remaining half of the oreo balls. Usually I end up using a little more of the white chocolate than I do the reg. chocolate because it takes more white to cover the oreoness.

Step 7: After you have dipped all the oreo balls, put the white ones aside and bring back the chocolate ones, but keep the white chocolate in the pot warm and runny. At this point I added a little bit of shortening (just a tsp or so), to make the chocolate a little more runny. Dip a butter knife in the white chocolate and drizzle it over the chocolate oreo balls, as seen below.

Once you have drizzled white chocolate on the brown balls, heat up the chocolate (again adding shortening if extra fluidity is needed...it also makes drizzling a little easier and as long as you don't add huge amounts of shortening, the flavor will be fine too) and then drizzle chocolate over the white balls. In the end it'll look something like this:


It took me about 2 1/2 hours to do a double batch from beginning to end. If you don't want to do it all in one shot, you can make the balls, and leave them in the fridge or freezer for a bit before you dip them. These are quite easy and they look nice (well...mine look like blobs, but you can make them look nice) and they taste great!

Let's Start Cookin'!!!

Hey! Kate here. Starting off the new family Blog!

This Christmas, as the Mower Fam was together for christmas, the girls started talking about cookbooks and how it's hard to find one with good pictures and normal food. To solve this tragic problem, we have decided to create a blog to exchange foods that we'll actually cook for our families and include pictures and recipies.

The authors of this blog are Marquette, Diedre, Kathleen, and me. Enjoy!