Cherries Jubilee

I joined a book club with some of the ladies from church and it was my turn to host the book. With the chaos of holidays we needed a quick and easy book and the first one that I could think of was "Dealing with Dragons" by Patricia C. Wrede. In the book Cimorene makes Cherries Jubilee for the dragon Kazul a few times, so I thought that it would be fun to make cherries jubilee for the book club meeting. I read quite a few recipes and ended up combining elements from a number of recipes that sounded the most tasty, and I dropped the flambe aspect. I want to try the flambe sometime, but this one wasn't for a flashy presentation so I left it out. Here is the Cherries Jubilee I came up with:
Cherries Jubilee atop Cherry Cha Cha base

Ingredients:

  • 2 TBS butter
  • 1 lb. ripe cherries
  • 1/2 c. sugar
  • 1 tsp cinnamon
  • 1/2 tsp orange extract
  • 1-2 TBS water
  • pinch of salt
  • 2 TBS cornstarch


    Directions:
    1. Pit the cherries. I don't have a cherry pitter so I found a stiff straw (from one of Darrow's sippy cups) and used it to push the pits out. It worked really well actually. I also read that a small cake decorating tip can be used the same way. 
    2. Melt the butter in a large skillet. 
    3. Add the pitted cherries and "saute" for just a minute. 
    4. Add all remaining ingredients, with the cornstarch being last. Sprinkle the cornstarch over the mixture rather than just dumping it in. 
    5. Cook over medium heat until the juices have thickened to your liking.
    6. Serve with vanilla ice cream, cake, cheesecake, or (as pictured above) Cherry Cha Cha and use these as the cherries! 
    This was so yummy. I love the flavor. Not too sweet at all. Mmmm. We'll be making this one again!


    Cherry Cha Cha

    Pictured without the cherry topping
    This is a great no-bake cheesecake-like dessert and is great plain or with toppings.

    Ingredients:

    • 1/3 c margarine (the original recipe called for 1/4 c. and I found that wasn't enough to hold the crust together at all)
    • 1 1/3 c. graham cracker crumbs
    • 1/4 c. sugar
    • 4 oz cream cheese
    • 1 c. powdered sugar
    • 1/2 tsp lemon juice
    • 1 small instant vanilla pudding
    • 3/4 c. milk
    • 1 small container Cool Whip (I didn't have Cool Whip on hand, but I did have packets of Spiffy Whip, so I made one of those instead)
    • 1 can cherry pie filling
    Directions:
    1. Melt margarine in an 8x8 casserole dish or 9" pie pan. 
    2. Add graham cracker crumbs and sugar into the butter, and press into the bottom of the pan to form a crust. 
    3. Cream together the cream cheese, powdered sugar, and lemon juice. 
    4. In a separate bowl mix the vanilla pudding with the milk. 
    5. Fold into the cream cheese mixture. 
    6. Fold in the Cool Whip. 
    7. Spoon into pan over crust. 
    8. Top with cherry pie filling; chill. 

    Pumpkin Maple Cheesecake

    I know I already posted this on my blog, but I thought I'd put it here so it's easy for me to find again. 

    I'm not a take a picture of my breakfast and post it online kind of a girl, but today I'll make an exception because you really should try this recipe. What did I have for my most nutritious and awesome breakfast? 


    Pumpkin Maple Cheesecake! 

    No joke.

    This was my first baked cheesecake in my brand new spring form pan. I was excited, but nervous all at the same time. For Cameron's work holiday party the employees all brought in cheesecakes for a cheesecake war. This was our contribution. It's always iffy trying a new recipe to present to other people, but we did it. Ours tied for first for taste, so that was fun.

    It was way easier than I thought it would be to make. Even when I realized I forgot to buy cream for the glaze and had to substitute evaporated milk (I read around the internet and picked the cream substitute I thought sounded like it'd work best), it turned out fantastic. New fall favorite right here. You really should go and make it. I found the recipe on the Eagle Brand website.

    Ingredients

    • 1 1/4 cups graham cracker crumbs
    • 1/4 cup sugar
    • 1/4 cup butter, melted
    • 3 (8 oz.) packages cream cheese, softened
    • 1 (14 oz.) can Eagle Brand® Sweetened Condensed Milk
    • 1 (15 oz.) can pumpkin (2 cups)
    • 3 large eggs
    • 1/4 cup pure maple syrup
    • 1 1/2 teaspoons ground cinnamon
    • 1 teaspoon ground nutmeg
    • 1/2 teaspoon salt
    • MAPLE PECAN GLAZE
    • 3/4 cup pure maple syrup
    • 1 cup (1/2 pint) heavy cream
    • 1/2 cup chopped pecans

    Instructions

    • HEAT oven to 325ºF. Combine graham cracker crumbs, sugar and butter in medium bowl; press firmly into bottom of ungreased 9-inch springform pan.
    • BEAT cream cheese until fluffy in large bowl. Gradually beat in sweetened condensed milk until smooth. Add pumpkin, eggs, maple syrup, cinnamon, nutmeg and salt; mix well. Pour into prepared pan.
    • BAKE 1 hour 15 minutes or until center appears nearly set when shaken. Cool 1 hour. Cover and chill at least 4 hours. Top with Maple Pecan Glaze.
    • MAPLE PECAN GLAZE
    • COMBINE syrup and cream in 2 or 3-quart saucepan. Bring to a boil over medium heat. Boil rapidly, 10 to 15 minutes or until slightly thickened, stirring occasionally. Reduce heat to low. Simmer an additional 5 to 10 minutes, stirring constantly, until thickened. Add pecans. Cover and chill until ready to serve. Stir before serving.

    So now if you'll excuse me, I have a face to stuff (and subsequently a weight loss challenge to lose, bahaha).

    Creamy Green Chile Chicken Enchilada Soup


    If we had different colored bowls, this would look way more appetizing I'm sure, but we have yellow bowls so the yellowish green soup when in the yellow bowls.

    We read a few crockpot green chile soup recipes online, but it was already dinner time so we decided to just wing it and make up our own. It hit the spot and was delicious!

    Ingredients:

    • 2 cups green enchilada sauce
    • 1 small can green chile (we didn't actually use this since the enchilada sauce we used had a ton of green chile chunks in it)
    • 2 cups chicken broth (we didn't have real broth, so we actually used 2 cups hot water and a chicken bouillon cube)
    • 1/4-1/2 tsp chile powder (we have red chile powder and green chile powder so we used green chile powder but all the recipe we read called for red chile powder)
    • 1/2 tsp cumin
    • 1/2 tsp onion powder
    • 1/4 tsp garlic powder
      • I'm not going to lie...I just sprinkled the cumin, onion powder, and garlic powder in...I didn't measure...so those are my guestimate amounts
    • 3 potatoes, peeled and chopped (we only had 3 small potatoes left in the bag...but you can put more in and it'd taste fine)
    • 1 large chicken breast, cut into smallish chunks
    • 1 cup minute rice
    • 4 oz cream cheese
    • A handful (maybe 1/3 c.) of shredded swiss cheese. (optional! I only used this because we had it. This recipe will work fine without swiss cheese)
    • Shredded cheddar cheese for top
    • Other garnishes could include sour cream, tortilla strips, or cilantro
    Directions
    1. Combine the enchilada sauce, chile, broth, seasonings, potatoes, and chicken into a saucepot over medium high heat. Bring to a boil. 
    2. Boil until the potatoes are half way to tender, and add the minute rice. Reduce heat to medium low and simmer until potatoes are tender and chicken is cooked through. 
    3. Stir in cream cheese (and swiss if you're going to use it). 
    4. Serve topped with cheese and any other garnishes you want. 
    Makes 4 hearty bowls of soup. 

    Pumpkin Pie from a Pumpkin


    Saw this on my personal blog and realized it wasn't over here on this blog. So here it is! 

    I just happened to have a pumpkin that I didn't end up carving for Halloween...so I decided to try my hand at making a pumpkin pie completely from scratch. I wish I had taken pictures during the whole process, but oh well. Here's what I did:
    1. Washed the outside of the pumpkin with warm water and a dab of soap.
    2. Cut the pumpkin sorta in half...the knife didn't want to cut straight, so it was a jaggedy half.
    3. Scooped out the seeds and guts with an ice cream scoop (on my list for next years jackolantern adventures!).
    4. Placed each half in a baking pan, added about 1 1/2 cups of water to the bottom of the pan, covered the pan/pumpkin in tin foil, and put it in the oven.
    5. Baked the pumpkin halves for about 1 to 1 1/2 hours at 350 degrees.
    6. When it was all done, I took the skin off and then mashed the cooked pumpkin into a pulp. It was fun.
    7. I let the pulp drain in a colander lined with napkins (cheesecloth or heavy duty paper towels probably would have been better, but I didn't have those) while I went to the store to get the rest of the ingredients for the pie.
    8. After returning from the store, I mixed up the goop, made the pie crust, put the goop in the crust and put it in the oven at 350 degrees. I didn't keep track of how long it took to cook, but I took it out when a knife inserted in the middle came out clean.

    It actually turned out pretty good, I was quite pleased. Here's the recipe I used:

    Pie Crust:
    3 cups flour
    1 cup shortening
    1 tsp salt
    cold water to bind (I think I used about 6 or 7 TBS)
    a pinch of baking powder (I think I used about 1/8 tsp)

    Combine dry ingredients, then cut in shortening. Mix by had until dough begins to stick together (don't over mix). On a floured counter/table I rolled the dough out a little bit, then folded it in half. I did this about 3 times (don't overdo the mixing/kneading/folding...you want the crust to be flaky). Then I rolled the dough out, folded it in 1/4's (to make it easier to transport to the pie pan) and then unfolded in in the pan, cutting of extra edges.

    Pumpkin Pie Filling:

    1 cup sugar
    1.5 tsp ground cinnamon
    1 tsp ground cloves
    1 tsp ground allspice
    1/2 tsp ground ginger
    1/2 tsp salt (recipe said it was optional...so I actually only put in 1/4 tsp)
    4 eggs (for a more dense pie, only use 3)
    3 cups of pumpkin pulp goop
    1.5 cans (12 oz) evaporated milk (for a more dense pie, only use 1 can).

    Combine all ingredients (I put them in the blender and blended them to make sure it was well smooshed together), and then pour in the unbaked crust. There will probably be enough pumpkin pie filling for 2 pies. Bake at 350 degrees until a knife/toothpick/finger (just kidding about the finger) comes out clean.

    Cheesecake Squares with Blackberry Sauce

     Not to brag or anything, but I was informed that this is possibly the yummiest dessert I've ever made. That may be true, or it could just be that Ethan was excited to get to eat cheesecake (which is his all time favorite thing in the world). This is pretty easy to make, although it does require some planning ahead as it needs a long time to cook and cool.
    What You Need:
    For the Crust:
       1 1/2 cups finely crushed regular graham crackers (about 20 squares)
       1/3 cup butter or margarine, melted
       3 TBS sugar
    For the Cheesecake:
       1 package (8 oz) cream cheese, softened
       1/2 cup ricotta cheese
       3/4 cup sugar
       2 eggs
       2 TBS butter or margarine, melted and cooled
       1 1/2 TBS cornstarch
       1 1/2 TBS flour
       1/2 TBS vanilla extract
       1 cup sour cream
       toppings of choice, for example: fresh fruit, chocolate syrup, blackberry sauce
    What You Do:
    For the Crust:
        In medium bowl, stir all ingredients until well mixed. Press mixture firmly against bottom of 9-inch baking dish.
    For the Filling:
        In a mixing bowl, beat cream cheese, ricotta and sugar until smooth. Add the eggs, one at a time, mixing well after each addition. Add butter, cornstarch, flour and vanilla; beat until smooth. Fold in sour cream. Pour on top of your graham cracker crust. Bake, uncovered, at 325 degrees for 1 hour. Do NOT open oven door. Turn oven off. Let cheesecake stand in closed oven for 2 hours. Cool completely on a wire rack. Chill several hours or overnight. Top each square with topping of choice, if desired (Ethan actually prefers his without any toppings, weirdo).

    Blackberry Dessert Sauce

    We've been picking blackberries around our house for a few weeks now and experimenting with new ways to enjoy them. The milkshakes were somewhat mediocre, but we have had success with this sauce. We've eaten it on pancakes, ice cream, crepes, cheesecake, and oatmeal and so far it's been a hit each time. The recipe was originally designed for raspberries, so you may have to adjust the amount of sugar when using a different type of berry.  
    Ready to go on a big bowl of ice cream (seeds have been strained out)
    What You Need:
       3 TBS sugar (I used a bit more since my blackberries were pretty tart)
       2 tsp cornstarch
       1/3 cup water
       1 box (10 oz) frozen raspberries in syrup, thawed and undrained (I used my kitchen scale to measure out 10 oz of fresh blackberries, next time I make it I'll measure how many cups that is)
    On cheesecake (not strained)
    What You Do:

    In 1-quart saucepan, mix sugar and cornstarch. Stir in water and berries. Cook over medium heat, stirring constantly, until mixture thickens and boils. Boil and stir 1 minute.
    Strain sauce through a strainer into bowl to remove seeds if desired. (If I'm going to be straining the seeds out I will take a potato masher and mush all the juice out of the berries in the sauce before I strain them, just to make sure we don't miss out on any of the awesome yumminess.) Serve sauce warm or cool. Store covered in refrigerator up to 10 days.  

    Cuban rice stuff

    Cuban Rice:

    Uncle Max made this once a long time ago and I always remembered how good it was. The other day I looked up how to do it.
    The basics of it is a pile of rice, with an over-easy egg in the middle of it. You put a slice of fried ham (or whatever lunch meat you have around). Then you put the tomato sauce over it all. The sauce is called Sofrito apparently.
    ·         1 can of crushed tomatoes. (We only ever have diced so I crush my own)
    ·         1 green pepper
    ·         1 onion
    ·         2-3 cloves garlic
    ·         1 tsp (or more) Paprika
    ·         Salt and pepper

    Saute the pepper, onions, garlic in olive oil. Add the tomatoes. Season with the paprika, salt and pepper.  Pour the sauce over your rice and egg, top it with the meat. It sounds weird, but its really good.

    Jambalaya

    Alright, here is one of my recipes for Jambalaya. I had this a few times in Mississippi, and this tastes almost just like what I had in the South.
    ·         2 chicken breasts
    ·         1 smoked sausage or polska or something like that. The authentic recipe always calls for anduille sausage, but that is kind of hard to find.
    ·         1 onion
    ·         1 bell pepper
    ·         5 or 6 cloves of garlic (or however much you like)
    ·         5 ribs of celery
    ·         3 cans of tomato paste
    ·         1 can of diced tomatos
    ·         8 cups of chicken stock (Diedre told me to make it with 1 cube of bullion per cup of water)
    ·         Seasoning mix: 2 tsp cayenne, 2 tsp black pepper, 1 tsp white pepper, 1 tsp oregano, 1 tsp thyme. Careful with the cayenne, 2 tsp makes it spicy. If your spouse doesn’t like spicy stuff you will be stuck with a whole pot of this stuff that you have to eat on your own. This may sound alright until you are on your 3rd day of it. The thyme really makes it, you may add more if you like it.
    ·         2 bay leaves
    ·         Salt
    ·         4 cups rice

    Cut the chicken into bite size pieces and brown the chicken with salt and pepper.  Next lightly fry the sausage. Saute the onions, garlic, peppers, and celery.  Once the sauté is almost done add the tomato paste and le that caramelize a little. Careful not to burn it.  Pour in two cans of the chicken stock and stir it around. Add the seasoning, tomatoes, and salt to taste. Cook for ~10 minutes. Add the meat and cook another 10 minutes. Add the rest of the stock. Add any seasoning to taste. Stir in the rice and cook until the rice is done.  I have done this both in a pot on the stove and in a dutch oven in the oven. It worked so much better in the oven. The pot on the stove burned on the bottom and the seasoning didn’t seem to combine all that well. This makes a bunch, so half it if you don’t want to eat on it for a while.  


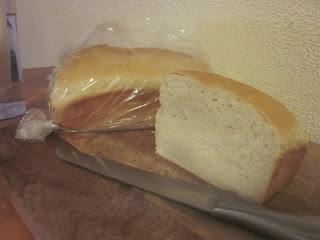
    Mom's White Bread

    This is the recipe my mom used to use for bread before she switched to whole wheat bread. I don't have a wheat grinder, so I just make this fluffy white stuff and pretend it's just as good for me as the whole wheat kind. It's SO yummy, and really not that hard to make. 

    What you need:
    2 cups hot water (it can be pretty hot, as long as you can hold your hand in the water for a few seconds, you know it's not hot enough to kill the yeast)
    1 TBS active dry yeast
    2 tsp salt
    1/4 cup shortening
    1/4 cup sugar
    5-7 cups flour

    What you do:
    *In a large bowl, combine the water, yeast, salt, shortening, sugar, and 1 cup of flour. Mix this fairly well (you'll probably still have lumps of shortening, don't worry about them, they'll get dealt with later), then leave it to rest for about 10 minutes.
    *Add in the flour, one cup at a time, mixing well after each cup is added. Keep adding cups of flour until the dough gets too thick to stir in any more. If you are using a hand held mixer, you will probably have to switch to an old fashioned stirring spoon to get enough flour into your dough for it to be workable.
    *Dump the dough out onto a floured surface and knead for 5-8 minutes, or until the dough cleans the table and is nice and springy. Dribble just a bit of oil in the mixing bowl, then place your ball of dough back in the bowl, turning once to coat all sides with the oil.
    *Let rise is a warm place until dough has doubled in size, about an hour. Divide your dough into 2 pieces and shape into loaves. Place in greased loaf pans and allow to rise until doubled in size.
    *Bake at 350 degrees for 20-25 minutes or until it's golden brown on top and sounds hollow when you take it out of the pan and thump on the bottom. Remove from pans and let cool on wire rack. When the bread is completely cool, store in plastic bags.

    Irish Soda Bread


    I made this to go with our Dublin Coddle for St. Patty’s day this year. I’ve never had soda bread before so I can’t say if this is an authentic recipe or not, but it was pretty tasty. It’s a pretty dense, crusty bread, so not great for sandwiches but really good for sopping up extra sauce/gravy.
    What you Need:
    3 ½ cups flour
    1 tsp baking soda
    ¾ tsp salt
    1 ½ cups buttermilk (I substituted 1 ½ TBS lemon juice plus enough milk to equal 1 ½ cups total)
    What you do:
    Preheat oven to 425 degrees. Sprinkle a thin layer of flour on a baking sheet.
    Mix flour, baking soda, and salt in a large bowl. Mix in enough buttermilk to form moist clumps. Gather dough into a ball. Turn out onto lighly floured surface and knead just until dough holds together, about 1 minute.
    Shape dough into a six inch diameter by two inch high round. Place on baking sheet. Cut a one inch deep X across the top of the dough, extending almost to the edges. Bake until bread is golden brown and sounds hollow when tapped on bottom, about 35 minutes. Transfer bread to a wire rack and cool completely. 

    Dublin Coddle

    So, being the splendid planner that I am, I woke up the morning of St. Patty’s day and thought that maybe it would be fun to do something special for dinner that evening in honor of the holiday. I did some research online and came up with a few ideas. I wanted something authentically Irish, and it turns out corned beef and cabbage (the only “Irish” meal I knew of) is actually an American thing. I found a few recipes that seemed to be traditional Irish fare, and decided to give them a try. Our menu ended up consisting of Dublin Coddle, Irish Soda Bread, a not-so-authentically-Irish-but-still-festive green fruit salad (granny smith apple, kiwi fruit, and green grapes with a squirt of lime juice to keep the apple from turning brown), and mint chocolate chip milkshakes for dessert(again not Irish, but green so it sorta counts).
    Dublin Coddle seems to be a dish that comes specifically from Dublin. It’s not found all over Ireland but is just a local thing. It’s super easy to throw together and SO yummy! I adapted my recipe from here.
    What you need:

    3-4 medium sized potatoes, peeled and quartered
    1 large onion, peeled and sliced thickly
    1 lb good quality pork sausages (I couldn't find anything at Walmart that really fit this description, so I used Polska Kielbasa)
    1 lb bacon, thick cut (my research suggested that American style bacon wouldn't work for this recipe and that if you couldn't get your hands on European style bacon to go with Canadian bacon or ham. I used ham that I cut up into chunks)
    1 cup broth (I used chicken beef or ham stock would work too)
    3-4 TBS fresh chopped parsley (I used dehydrated, it worked fine)
    Salt
    Pepper

    What you do:
    Grill or broil the sausages and bacon long enough to put some color on them. Be careful not to dry them out. Drain briefly on paper towels. When cooled enough to handle, chop bacon into one-inch pieces. You can also chop the sausage into smaller pieces, but don’t have to.
    Preheat oven to 300 degrees. In a large flameproof heavy pot with a tight fitting lid, layer your ingredients in the following order: onions, bacon, sausage, potatoes. Season each layer liberally with the parsley, salt and pepper. Pour the broth over the top. On the stove, bring the liquid to a boil. Immediately turn the heat down and cover the pot.
    Put the covered pot in the oven and cook for at least 3 hours (more time will only make it better). At the 2 hour point, check the pot and add more water if necessary. There should be about an inch of liquid at the bottom of the pot at all times.
    Serve with fresh soda bread to mop up the gravy.

    Harry Potter Party Treats: Honeydukes Express

    We just had our New Beginnings program and did a Harry Potter theme (more on that here). After the program we had refreshments off the Honeydukes Cart (the treats cart on the train that takes the students to Hogwarts).  Just thought I'd show you what we did for treats!


    We looked up some of the treats on the cart and came up with our own versions of them. Sandy made all the awesome signs for us, and then we all just went through our cupboards and found dishes to use for the treats.

    Magic Wands:
    Pretzel sticks dipped in melted chocolate and rolled in sprinkles. These were SO yummy. I loved the salty against the sweet along with the crunchiness.  

    Chocolate Frogs:


    Here's a size reference for you. 
    I ordered a frog mold from Amazon to make these. I figure with a little boy in our lives now, a frog mold will be fun (chocolates, jello, ice, etc.), so I just got it for me to have at home (and it really was a decent price). I got the 2lb bag of melting chocolates made for those chocolate fountains and that made 32 frogs. These disappeared fast! 


     Anti-Dementor Chocolates:
    Hehe...I just made a connection...a dementor's "kiss" sucks out a person's soul...a chocolate kiss protects it apparently. Bahahaha, love it.  

    Jelly Slugs:

    Levitating Lemon Drops:

    Bertie Botts Every Flavor Beans:

    Jelly Belly sells actual every flavor beans, but at $2.25 for a small box, we couldn't afford enough for everyone. So we just got the regular assortment of Jelly Bellies. 

    Fizzing Whizbees (aka caramels): 
     The recipe for these can be found here

    Butterbeer:

    I didn't get an actual picture of the butter beer. But it pretty much looks like cream soda with whipped cream on top...because that's just about what it is. We used this recipe for our butterbeer. We thought the flavor of the extracts was way too strong, most of the adults didn't like it. But the kids thought it was alright. If we were to make it again I'd just use butterscotch flavoring and not add as much as the recipe calls for. 

    Easy Caramels


    Ingredients:

    • 1 cup butter or margarine
    •  2 1/4 cup brown sugar
    • Dash salt
    • 1 cup light corn syrup
    • 1 15oz can Eagle Brand sweetened condensed milk
    • 1 teaspoon vanilla
    You will also need a candy thermometer. I also used both parchment and waxed paper in making these.

    Directions:
    1. Melt butter in heavy saucepan. 
    2. Add sugar and salt. Stir thoroughly. 
    3. Stir in corn syrup and mix well. 
    4. Gradually add sweetened condense milk, stirring constantly. 
    5. Cook and stir over medium heat to 244 degrees-firm ball stage (**Read next note!!**)
      1. This may need to be adjusted to your specific area. Look up your altitude, find the boiling point (http://www.engineeringtoolbox.com/boiling-points-water-altitude-d_1344.html). In Silver City, the altitude is 5895 so the boiling point is 201. 
      2. Subtract your boiling point from 212 (in Silver City: 212-201=11). 
      3. Subtract the number you just calculated (i.e. 11) from 244 (the original temperature for the firm ball stage). Silver City: 244-11=233. This is your new firm ball stage temperature for your area. Cook the caramel mixture to THIS temperature if you are not at sea level. 
    6. Remove from heat; stir in vanilla. 
    7. Pour into buttered 9x13 pan. 
      1. You can also spray the pan with Pam, place parchment paper inside the pan, then butter the parchment paper. This makes clean up super super easy!!
    8. Cool and cut into squares. It may take 8 hours to cool completely. 
    9. Caramel squares may be wrapped in wax paper to keep from sticking to each other at this stage.