Showing posts with label Great for Groups and Parties. Show all posts

Calzones

I will admit to never having had a calzone before I made these, but I'm so glad I did! I found this recipe in my favorite Betty Crocker cook book and just had to give it a try. These are pretty easy to make and SO yummy. You can fill them with whatever you have handy and you've got a really yummy dinner ready to go. This filling recipe came from my Betty Crocker cookbook, but we've also used cottage cheese (instead of ricotta), pepperoni, sausage, and pretty much anything else you might put on pizza). Here's a whole page of ideas for ways to make this yummy dinner treat your own. 
What you Need (crust):
2 1/2-3 cups all-purpose flour
1 TBS sugar
1 tsp salt
1 pkg regular dry or quick active dry yeast (2 1/4 tsp)
3 TBS olive or veggie oil
1 cup very warm water (120-130 degrees F)

What you Need (filling):
2 cups shredded mozzarella cheese (8 oz)
1/4 lb salami, cut into thin strips
1/2 cup ricotta cheese
1/4 cup chopped fresh basil leaves
2 roma tomatoes, chopped
ground pepper
1 large egg, slightly beaten

What you Do (crust):
In large bowl, mix 1 cup of the flour, the sugar, salt, and yeast. Add oil and warm water. Beat with electric mixer on medium speed 3 minutes, scraping bowl requently. Stir in enough remaining flour until dough is soft and leaves sides of bowl. Place dough on lightly floured surface. Knead 5-8 minutes or until dough is smooth and springy. Cover loosely with plastic wrap and let rest 30 minutes. (At this point you could just use this dough to make pizza, but why stop here when you could make calzones?)

What you Do (calzones):
Heat oven to 375 degrees F. Grease 2 cookie sheets.
Divide dough into 6 equal parts. On lightly floured surface, roll each part into 7-inch circle with floured rolling pin.
Top half of each dough circle with mozzarella cheese, salami, ricotta cheese, basil and tomatoes to within 1 inch of the edge. Sprinkle with fresh ground pepper. Carefully fold dough over filling; pinch edges or press with fork to seal securely.
Place calzones on cookie sheets. Brush with egg. Bake about 25 minutes or until golden brown.

We like to warm up some marinara (or whatever pasta sauce we have handy) and serve it as a dipping sauce. YUM!
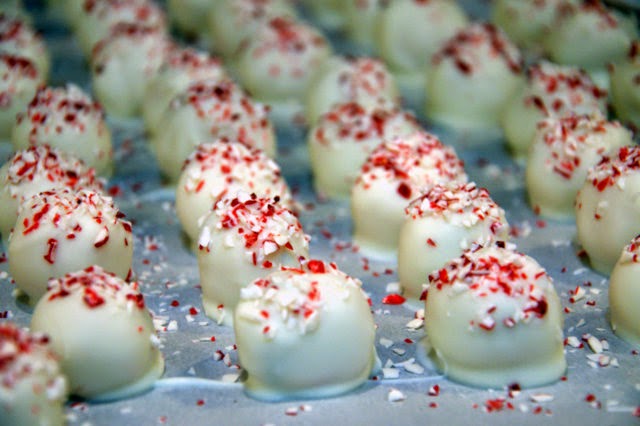
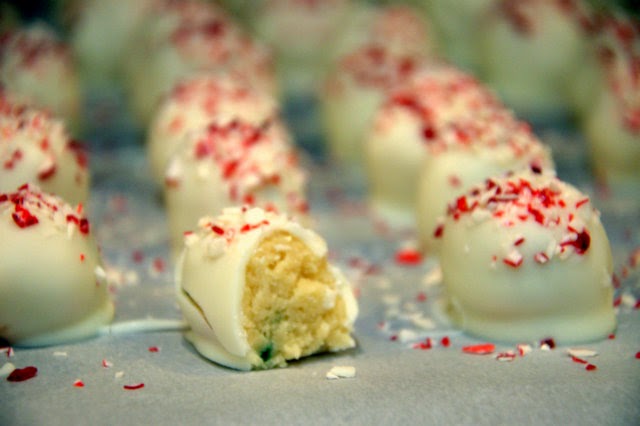
Peppermint Cake Batter Truffles

I took a recipe I found on Pinterest and "Minterized" it to fit the holidays better. I turned confetti cake batter truffles into Peppermint Cake Batter Truffles.


Ingredients:

  • 1/2 c. (1 stick) unsalted butter
  • 1/2 c. white sugar
  • 1 c. white cake mix
  • 1 1/2 c. flour
  • 1/8 tsp salt (omit if using salted butter)
  • 1 tsp peppermint extract
  • 1/2 tsp vanilla (optional)
  • 3-4 TBS milk
  • sprinkles (optional)
  • 1 pkg vanilla/white almond bark or white candy coating
  • crushed mint candies for topping


Directions:

  1. Cream the butter and the sugar until mixed well. 
  2. Add the cake mix, flour, salt, and extracts and mix thoroughly. 
  3. Add in the milk 1 TBS at a time until the mixture reaches a doughy consistency. Add in the sprinkles. It will be slightly sticky, but still be able to be rolled into balls. 
  4. Roll the dough into one inch balls and place in the freezer for about 10 minutes to firm up. 
  5. While dough is chilling, melt coating as per directions on the package. If using a 2lb block of almond bark, I usually use 2/3 of the block. If needed, add 2-4 TBS of shortening to the candy coating to make it more smooth and thin. 
  6. Prepare a pan with waxed paper or parchment paper. 
  7. Dip the truffle balls in the candy coating. I usually drop 2-4 balls in the coating at one time, and then I scoop them out one at a time with a fork to help drain off the excess coating. Place on the papered pan. Immediately sprinkle with crushed peppermint candy (you must do this before the coating sets!). 
  8. Allow a few minutes for the coating to set. 
  9. These are great freshly made, but are especially good after a few hours when the flavors have had a chance to mix and meld. 

Cheesecake Squares with Blackberry Sauce

 Not to brag or anything, but I was informed that this is possibly the yummiest dessert I've ever made. That may be true, or it could just be that Ethan was excited to get to eat cheesecake (which is his all time favorite thing in the world). This is pretty easy to make, although it does require some planning ahead as it needs a long time to cook and cool.
What You Need:
For the Crust:
   1 1/2 cups finely crushed regular graham crackers (about 20 squares)
   1/3 cup butter or margarine, melted
   3 TBS sugar
For the Cheesecake:
   1 package (8 oz) cream cheese, softened
   1/2 cup ricotta cheese
   3/4 cup sugar
   2 eggs
   2 TBS butter or margarine, melted and cooled
   1 1/2 TBS cornstarch
   1 1/2 TBS flour
   1/2 TBS vanilla extract
   1 cup sour cream
   toppings of choice, for example: fresh fruit, chocolate syrup, blackberry sauce
What You Do:
For the Crust:
    In medium bowl, stir all ingredients until well mixed. Press mixture firmly against bottom of 9-inch baking dish.
For the Filling:
    In a mixing bowl, beat cream cheese, ricotta and sugar until smooth. Add the eggs, one at a time, mixing well after each addition. Add butter, cornstarch, flour and vanilla; beat until smooth. Fold in sour cream. Pour on top of your graham cracker crust. Bake, uncovered, at 325 degrees for 1 hour. Do NOT open oven door. Turn oven off. Let cheesecake stand in closed oven for 2 hours. Cool completely on a wire rack. Chill several hours or overnight. Top each square with topping of choice, if desired (Ethan actually prefers his without any toppings, weirdo).

Blackberry Dessert Sauce

We've been picking blackberries around our house for a few weeks now and experimenting with new ways to enjoy them. The milkshakes were somewhat mediocre, but we have had success with this sauce. We've eaten it on pancakes, ice cream, crepes, cheesecake, and oatmeal and so far it's been a hit each time. The recipe was originally designed for raspberries, so you may have to adjust the amount of sugar when using a different type of berry.  
Ready to go on a big bowl of ice cream (seeds have been strained out)
What You Need:
   3 TBS sugar (I used a bit more since my blackberries were pretty tart)
   2 tsp cornstarch
   1/3 cup water
   1 box (10 oz) frozen raspberries in syrup, thawed and undrained (I used my kitchen scale to measure out 10 oz of fresh blackberries, next time I make it I'll measure how many cups that is)
On cheesecake (not strained)
What You Do:

In 1-quart saucepan, mix sugar and cornstarch. Stir in water and berries. Cook over medium heat, stirring constantly, until mixture thickens and boils. Boil and stir 1 minute.
Strain sauce through a strainer into bowl to remove seeds if desired. (If I'm going to be straining the seeds out I will take a potato masher and mush all the juice out of the berries in the sauce before I strain them, just to make sure we don't miss out on any of the awesome yumminess.) Serve sauce warm or cool. Store covered in refrigerator up to 10 days.  

Harry Potter Party Treats: Honeydukes Express

We just had our New Beginnings program and did a Harry Potter theme (more on that here). After the program we had refreshments off the Honeydukes Cart (the treats cart on the train that takes the students to Hogwarts).  Just thought I'd show you what we did for treats!


We looked up some of the treats on the cart and came up with our own versions of them. Sandy made all the awesome signs for us, and then we all just went through our cupboards and found dishes to use for the treats.

Magic Wands:
Pretzel sticks dipped in melted chocolate and rolled in sprinkles. These were SO yummy. I loved the salty against the sweet along with the crunchiness.  

Chocolate Frogs:


Here's a size reference for you. 
I ordered a frog mold from Amazon to make these. I figure with a little boy in our lives now, a frog mold will be fun (chocolates, jello, ice, etc.), so I just got it for me to have at home (and it really was a decent price). I got the 2lb bag of melting chocolates made for those chocolate fountains and that made 32 frogs. These disappeared fast! 


 Anti-Dementor Chocolates:
Hehe...I just made a connection...a dementor's "kiss" sucks out a person's soul...a chocolate kiss protects it apparently. Bahahaha, love it.  

Jelly Slugs:

Levitating Lemon Drops:

Bertie Botts Every Flavor Beans:

Jelly Belly sells actual every flavor beans, but at $2.25 for a small box, we couldn't afford enough for everyone. So we just got the regular assortment of Jelly Bellies. 

Fizzing Whizbees (aka caramels): 
 The recipe for these can be found here. 

Butterbeer:

I didn't get an actual picture of the butter beer. But it pretty much looks like cream soda with whipped cream on top...because that's just about what it is. We used this recipe for our butterbeer. We thought the flavor of the extracts was way too strong, most of the adults didn't like it. But the kids thought it was alright. If we were to make it again I'd just use butterscotch flavoring and not add as much as the recipe calls for. 

Gingerbread People Cookies

I made these to share with our playgroup, and we had a marvelous time frosting and decorating them! We also REALLY had a marvelous time eating them, they were SO yummy!

This recipe comes to you from this cookbook, which came to me from Kate:

What you need for the cookie dough:
3/4 cup unsalted butter, at room temperature
3/4 cup golden brown sugar, firmly packed
1/4 cup light molasses
2 large egg yolks
2 1/3 cups flour
2 tsp ground cinnamon
2 tsp ground ginger
1 tsp ground allspice
1/2 tsp baking soda
1/4 tsp ground cloves
1/4 tsp salt

What you need for the icing:
1 cup powdered sugar
1/4 tsp vanilla extract
4-5 tsp milk

What you do for the cookies:
*In a bowl, combine the butter, brown sugar, and molasses. Using an electric mixer on medium speed, beat until light and fluffy, about 3 minutes. Add the egg yolks and beat until incorporated.
*Sift together remaining ingredients in a bowl. Add the flour mixture to the butter mixture and mix on low speed just until incorporated. Divide the dough into thirds, shape into flat disks. Wrap in plastic wrap and refrigerate overnight.
*Position the oven rack in the upper third of the oven and preheat to 375 degrees. Grease 2 large cookie sheets with cooking spray. 
*On a lightly floured surface, roll out 1 dough disk to 1/4 inch thickness. Using cookie cutters, cut out gingerbread people shapes. Using a metal spatula, transfer to cookie sheet, spacing them about 1 inch apart. Gather the scraps into a ball, wrap in plastic wrap, and refrigerate. Repeat rolling and cutting with remaining dough disks, one at a time. 
*Bake until the cookies begin to turn golden brown at the edges, about 10 minutes. Transfer to a wire rack and allow to cool completely. 
I cannot for the life of me get blogger to turn this one the right way. Sorry about the sideways gingerbread men!
What you do for the frosting:
*In a small bowl, combine the sugar and vanilla. Stir in enough milk to thin to the desired consistency. Decorate the cookies with the icing. Let the icing dry completely before storing cookies in an airtight container at room temperature for up to 1 week. 
Erik and his friends decorating their gingerbread men. They were sure yummy!!!

Chocolate Crinkle Cookies

So this recipe came from a super cute cook book that was given to me forever ago (by someone amazing, by the way). I've looked at the pictures and thought "hmmm, there's some yummy looking stuff in here", but I've never actually gotten around to making any of the recipes. I was trying to decide what to make for FHE treats yesterday and decided these looked really yummy and not too complicated, so here you go.

These are super chocolatey and stay soft and chewy even after they cool, which makes them amazing.

What you need:
4 oz. unsweetened chocolate, chopped (I never have this on hand, so I use the substitution guide in my Betty Crocker cookbook that says to use 3 TBS baking cocoa plus 1 TBS melted shortening or butter for each oz of baking chocolate you're replacing. So for this recipe that comes to 3/4 cup baking cocoa and 4 TBS melted butter)
1/4 cup unsalted butter
4 large eggs
2 cups sugar
1 tsp vanilla extract
1 1/2 cups all-purpose flour
1/2 cup unsweetened cocoa powder, preferably Dutch-process (I just used regular)
2 tsp baking powder
1/4 tsp salt
1 1/2 cups miniature semisweet chocolate chips (I didn't have mini ones, I just used regular ones and they worked fine)
1/2 cup confectioner's sugar

What you do:

*Add the unsweetened chocolate (or above mentioned substitute) and butter to a heatproof bowl placed over (not touching) a pan of simmering water. Warm, stirring often, until the butter and chocolate melt and the mixture is smooth. Remove the bowl from the pan and let the mixture cool slightly. (I just threw the butter in a sauce pan, melted it over low heat, and then stirred in the cocoa powder)
*In a large bowl, combine the eggs, sugar, and vanilla. Using an electric mixer on medium speed, beat until the mixture is light in color and thick, about 3 minutes. Add the melted chocolate mixture and stir with a wooden spoon or beat on low speed until blended.
*In a bowl, stir together the flour, cocoa powder, baking powder, and salt. Add the flour mixture to the chocolate mixture and beat on low speed until blended. Add the chocolate chips and stir with a wooden spoon until incorporated. Cover the bowl with plastic wrap and refrigerate until the dough is firm enough to roll into balls, about 2 hours (ok, sometimes you can ignore the refrigeration step in a recipe, but DO NOT skip it this time. The dough is VERY SOFT and needs to firm up in the fridge so you can work with it).
*When you're ready to bake, preheat the oven to 325 degrees. Line 2 cookie sheets with parchment paper (I never have this either, I just used tinfoil). Sift the confectioner's sugar into a bowl.
*Roll a rounded TBS of dough between your palms into a 1 1/2 inch ball, then roll the ball in the confectioner's sugar to coat it completely. Place on a prepared cookie sheet. Repeat to shape and coat the remaining dough, spacing the balls 3 inches apart on the cookie sheets. Press each ball down slightly so that it stays in place on the cookie sheet. (I found that I had to put the dough back in the fridge to set back up every few minutes or it got too soft to work with)
*Bake 1 sheet of cookies at a time, until the tops are puffed and crinkled and feel firm when lightly touched, about 15 minutes. Let the cookies cool on the baking sheet for 5 minutes, then use a spatula to transfer the cookies to wire racks to cool completely. Store in an airtight container at room temp. for up to 3 days.

Le Bonhomme de Neige 7 Course Meal

When my brother was 14 or so, I told him that I'd do a full 7 course meal for him for a date if he ever wanted me to. Well, he finally called that in this past weekend. He and my cousin asked out two girls from my church and brought them out to the house for dinner, then took them bowling. I had so much fun deciding on a theme, putting the menu together, and getting decorations up. I LOVE doing these dinner parties. 

Brig and I decided on a Snowman theme and tried to incorporate that into as many of the courses as we could. I had plans to make snowmen for the table centerpiece as well, but I ran out of time. I do like what did pull together though. I hit up the after Christmas 50% off sale and got me a pack of 20 mini trees, some glittered and scented pinecones, 4 silver snowman ornaments, and 4 gold plate chargers. I also picked up 2 small packs of gold and silver ornaments for our New Years Tree (since we didn't get the tree decorated in time for Christmas, we ended up with a New Years Tree instead), and Cameron Brig and I worked on making ornaments as well. 

(click on any photo to see it larger)
The Decorations:


Thanks to Google Translate, we did the whole menu in French. I knew that no one coming to dinner knew French, but I figured it would help provide some good conversation (which it did) as they tried to figure out what each course was. 

And then we had the New Years Tree nearby for added awesomeness.  

The Menu:


Course 3: Salad
This was just a generic salad, with garlic cheese croutons and their choice of dressing (we have tons). Then I had the great idea to buy mozzarella cheese pearls and put three on a toothpick, topped with an olive to make a snowman. Only I found out when we opened the package of cheese that cheese pearls aren't necessarily round...so the cheese snowmen looked more like modern art then snowmen. Oh well. 

Course 4: Mango Sorbet. 
I forgot to get a picture of this course. We bought mango sorbet at the store (I made my own once and that was more than I wanted to deal with this go around). We served the sorbet in small decorative canning jars with a gold ribbon tied around the top. 

Course 5: Mashed Potato Snowman with Chicken gravy, served with Parmesan Asparagus,

Course 6: Chicken Cordon Bleu with Sauteed Peppers
I didn't end up getting a picture of this course either. But it was yummy! Cameron cooked up the chicken and it was perfection. We were going to serve it face up with a piece of rye toast cut into the shape of a hat so it would be a snowman head, but I forgot to do that...I forgot to even pull out the toast. But it was still delicious. 


Beverages:
Everyone had a water glass, but then we also gave them the option of Homemade Egg Nog or a Homemade Vanilla Cream Soda. We served the Egg Nog and Cream Soda in our fun "fancy" glasses, and drew on snowman faces with dry erase markers. 
For homemade vanilla cream sodas, fill a glass 3/4 of the way with shaved ice (like you get at sonic). Pour in your flavored Torrani syrup (found in the coffee aisle in your grocery store). In these glasses Cameron filled the cup about 1/4 of the way with the syrup. Pour Club Soda in the glass, filling about 3/4 of the remaining space. Finally pour in some heavy whipping cream or half and half (we used heavy whipping cream this go around). Stir and enjoy!


It was so much fun to serve the dishes and to carry out the dinner. I loved it. Cameron would periodically go out and provide some entertainment. He juggled osage oranges, he did a "magic show", he read the menu in his best and worst French accents, and was just a hit. All in all, I think it was a success. 

Cheese Balls

I made three cheese balls, and I was going to serve them stacked like a snowman, but they kept rolling off...so this worked. I only made 4oz. cream cheese worth of each cheese ball because I knew we wouldn't need too much. We served these with Rosemary Triscuits.

Cheese ball #1: Garlic Cheese Ball (the white one in the photo)

Ingredients
2 (8 oz) pkgs cream cheese, softened
1/2 c. butter
1 TBS prepared Dijon-style mustard
1 tsp minced garlic
1 (1oz) package ranch dressing mix

Directions:
In a medium bowl, beat all ingredients together. Cover and refrigerate 6-8 hours, or over night.


Cheese ball #2: New Mexico Cheese Ball (the pecan covered one in the photo) 

I adapted a recipe I found on allrecipes for this cheese ball.

Ingredients
4 large anaheim chile peppers (or canned green chile) or (I just used green chile powder)
1 1/2 pounds shredded pepper jack cheese
2 (8 oz) pkgs cream cheese
2 cloves garlic, minced
1 tsp. salt
1 tsp. pepper
2 cups finely chopped pecans

Directions:
1. If using raw green chile, preheat an outdoor grill for medium heat, and lightly oil the grate. Cook chiles on the preheated grill until the skin of the peppers has blackened and blistered, about 5 minutes. be careful not to overcook the peppers, or the skin will not come off easily. Turn the peppers often to cook evenly. Place the blackened peppers into a bowl and tightly seal with plastic wrap. Allow the peppers to steam as they cool, about 20 minutes. Once cool, remove the skins and seeds. Chop the peppers.
2. Combine the chopped peppers (or the chile powder) with the other ingredients (minus the pecans). Form the mixture into a ball and place in the freezer until very cold (about 15 minutes).
3. Spread the chopped pecans on a large cutting board or baking sheet (I just put them in a bowl). Roll the cheese ball in the pecans. Use your hand to pack any areas not covered by pecans.


Cheese ball #3: Yummy Cheese Ball (the cheese covered one in the photo) 

I didn't name this one...that was its given name.

Ingredients:
1 pound bacon (I used real bacon bits)
2 (8 oz) pkgs cream cheese
3 TBS mayonnaise
1 green onion, chopped
1 c. chopped pecans (I omitted these since I already had a pecan covered cheese ball)

Directions:
1. In a large skillet, fry the bacon. Remove from pan and drain on paper towels. Chop or break into small pieces.
2. In a medium sized bowl mix all ingredients (minus the pecans) together. When mixed well, form 2 balls out of the mixture. Cover and refrigerate 3 to 4 hours, or overnight.
3. Before serving, roll in pecans.

Healthy Fruit Dip

So I've been wanting to eat more fruit...but I'm not one to just pick up an apple and munch away. So I read a few recipes online and made a healthy fruit dip to help entice me to eat more fruit. It's working like a charm. I love this stuff.


Ingredients:
8oz. fat free sugar free (or reduced...or regular) plain yogurt
8 oz. fat free cream cheese
Sugar (I used truvia instead). I didn't measure...I just added a little bit at the time until the taste was about right. I probably used about 2-3 teaspoons of truvia (which is sweeter than sugar, so you'd have to add more sugar than that)

Just mix them all together with a hand mixer until it's light and fluffy. Mine's almost looks like marshmallow creme.

Black Bean and Corn Salsa

Okay, so I know the picture isn't the greatest, but I forgot to take one before we started dishing up. I was looking for something to help fill up our taco bowls, and decided to give this a try. I just threw this together with what I had around the house, but there are lots of fun recipes online for things similar to this online that included yummy things like avacado, fresh cilantro, green onions, etc...
What you need:
1 can black beans
1 can corn
Diced tomatoes (preferable fresh, but canned will work)
1 can green chili
diced onion
salsa
red chili poweder
garlic powder
ground cumin
oregano

What you do:
Dump everything together into a bowl, tasting the seasonings as you add them. Serve with tortilla chips, on tacos, in burritos, or in any other way you think sounds tasty.

Hot Chocolate Tiramisu

This was my FAVORITE part of our dinner. It was sooooo good! I've always wanted to try Tiramisu, but because it is a coffee based dessert I never tried it. Then, I found this recipe on pinterest and decided to give it a try! I had to make a few adjustments since the recipe calls for Bailey's Irish Cream Whiskey, but I thought it turned out amazing. I had never used Mascarpone cheese before, so that was kinda fun. I could've eaten it three meals a day for a week and never gotten tired of it. As I was loading the pictures of our dinner on my computer I accidentally deleted a bunch of them and, sadly, among them was the picture of our tiramisu. Luckily we had saved some to enjoy the next day so I took a picture of what was left to show you all. It did look so pretty before we dug into them. Oh well.
The recipe says it makes four servings, which is pretty accurate, though they'd be smallish ones. I only divided it between two cups, and we weren't able to finish all of it in one sitting.

Here is my version of this dessert:
What you need:
1/2 cup hot water
¼ cup hot chocolate powder
Hershey's chocolate syrup
2 whole eggs
2 tablespoon granulated sugar
2 cups mascarpone cheese  at room temperature (You could probably use regular cream cheese if you can't find mascarpone)
18 ladyfingers
extra hot chocolate mix
Whipped topping
What you do:
1. Mix the hot water and the hot chocolate powder. I actually ended up putting in a squirt of hershey's syrup to give it a more rich chocolatey flavor.
2. Divide the egg whites into a medium sized mixing bowl and the yolks into a heat proof mixing bowl. Place a small pot with just an inch or so of water in the bottom on your stove and start it simmering. Put the bowl with the egg yolks in it on top of the pot of water and add 1 TBS sugar to the yolks. You don't want the water to touch the bottom of the bowl. You could also use a double boiler for this if you're lucky enough to have one. Whisk the egg yolks and sugar over the hot water(don't let the water boil) for about five minutes, whisking the entire time. It will get really fluffy. If they start to look like scrambled eggs you've over cooked them and need to start over. Try a lower heat and faster stirring.
With a clean whisk or, preferably, an electric mixer, beat the egg whites until they start to look a little bubbly and fluffy. Add in 1 TBS sugar and continue to mix until they form stiff peaks. That means that when you stop your mixer and pull it out of the egg whites the foam stays in a peak shape instead of falling back into the bowl.
3. Now fold the mascarpone cheese into the egg yolk mixture, only folding in half the cheese at a time. Then fold the mascarpone/yolk mixture into the egg whites, again only folding in one half at a time. Adjust sugar level to suit your taste, just remember you're also going to be layering this with lots of sweet chocolate, so it's better if it's not too sweet.
4.  Place 3 ladyfingers in the bottom of your serving dish. Brush generously with hot cocoa mixture. Now spoon some of the mascarpone mixture on top of that. Next you sprinkle some of the hot cocoa powder on top of the cheese. (I wanted mine to be really chocolatey so I put a drizzle of hershey's syrup on top of the powder) Repeat these layers 1-2 times, ending with a layer of ladyfingers. Top with whipped topping, a sprinkle of hot cocoa powder, and a drizzle of Hershey's syrup. Garnish with a wafer straw cookie and enjoy.

Pomegranate Glazed Cornish Hens with Wild Rice Stuffing

I'm sitting here eating the leftovers of this as I type up this post, and it's sure yummy! It was such a pretty looking dish and it was fun to each get our own bird. It wasn't hard to make either, as long as your not bothered by handling raw poultry. The rice stuffing is so flavorful and moist and delicious. In this dish, there were a couple of ingredients I had never cooked with before. In the rice I used a Shallot and fresh pomegranate seeds (called arils). The hens are glazed with a mixture containing pomegranate molasses, which I had never had before and which I had to make myself because I couldn't find it anywhere.

What you Need:

  • 3/4 teaspoon ground cinnamon
  • Kosher salt and freshly ground pepper
  • 4 Cornish hens (about 1 1/4 pounds each), rinsed and dried
  • 15 jarred grape leaves (optional)(I didn't use these, I don't think they have them at my local grocery store)
  • 3 cups low-sodium chicken broth
  • 1 1/2 cups wild rice blend
  • 6 tablespoons unsalted butter
  • 1 large shallot, minced
  • 1 clove garlic, minced
  • 3/4 teaspoon ground ginger
  • 3/4 teaspoon ground cumin
  • 3/4 cup pomegranate seeds, plus more for serving
  • 2 tablespoons chopped fresh parsley, plus sprigs for serving
  • 2 tablespoons chopped fresh cilantro, plus sprigs for serving
  • 3 large egg yolks
  • 3/4 cup fresh orange juice
  • 1 tablespoon pomegranate molasses

What you do:

Mix the cinnamon, 4 teaspoons salt and 1/2 teaspoon pepper in a bowl; sprinkle all over the hens and inside the cavities. Place the hens on a rack set on a rimmed baking sheet and refrigerate, uncovered, at least 2 hours or overnight. Meanwhile, soak the grape leaves in water 1 hour.
Bring the chicken broth and 2 cups water to a boil in a saucepan; add the rice blend and cook as the label directs. Drain and rinse under cold water.

Preheat the oven to 400 degrees F. Melt 4 tablespoons butter in a large skillet over medium-high heat. Add the shallot, garlic, ginger and cumin and cook, stirring, until soft, about 3 minutes. Remove from the heat; add the cooked rice, pomegranate seeds, and chopped parsley and cilantro; toss to coat. Season with salt and pepper. Add the egg yolks and stir to combine.

Make the glaze: Bring the orange juice and pomegranate molasses to a boil in a small skillet over medium heat. Cook until reduced by half, about 5 minutes.A good way to measure how much something has reduced is to stick the handle end of a wooden spoon in the liquid and then mark how high up the handle it came with a rubberband or piece of string. Then, you can use the same spoon and keep checking until the liquid only comes half way up to the mark you made. Remove from the heat and swirl in the remaining 2 tablespoons butter.

Fill the cavity of each hen with about 1/2 cup of the rice mixture (reserve the rest); tie the legs together with twine. Roast 20 minutes, then brush with the pomegranate glaze. Continue roasting, glazing every 10 minutes, until a thermometer inserted into the thigh registers 165 degrees F to 170 degrees F, 1 hour to 1 hour, 10 minutes. (Rotate the hens halfway through cooking; if the skin gets too dark, cover loosely with foil.)
If you don't tie the legs together it won't affect the cooking, but it does leave the bird free to sprawl out all over the pan and then it doesn't look as pretty when you serve it. I just used some yarn I had left over from some project, and I also tied the wings as well so they'd stay put and looking nice. When tying the legs it helps to cross one over the other like I did in the second picture, and then tie the yarn around the feet and the pope's nose (that's what the tail is called, I'm not kidding).

Meanwhile, drain the grape leaves and pat dry. Use some of the leaves to line a 9-inch pie dish. Fill with the reserved rice mixture and drizzle with 2 tablespoons water. Cover with the remaining grape leaves, shiny side up, then cover with foil. (If you aren't using grape leaves, spoon the rice into a pie dish, sprinkle with water and cover with foil.) After the hens have roasted about 20 minutes, transfer the rice to the oven and cook until heated through, about 45 minutes.

Transfer the hens to a platter and add some parsley and cilantro sprigs and pomegranate seeds. Peel the grape leaves off the top of the rice and serve alongside the hens.
I got this recipe from Food Network Magazine.

Potage Crecy (Carrot Soup)

This was so yummy! We really enjoyed it and I'll probably make it again. Ethan gobbled it up! The color is a little off-putting, but the taste is great! I only made a half a batch and it made about 3 servings.
What you Need:
  • 1 lb fresh carrots, peeled and chopped into 1/2-1 inch thick pieces
  • 1 medium Russet (or other starchy) potato, peeled and chopped into pieces about the same size as the carrot pieces
  • 2 Tbsp unsalted butter
  • 1 medium onion, peeled and roughly chopped
  • 1 clove garlic, peeled and crushed
  • ½ cup dry white wine (I substituted chicken broth)
  • 1 qt vegetable broth or stock
  • Kosher salt and ground white pepper, to taste (I just used regular pepper and it tasted good)

  • What you do:
    In a large soup pot melt the butter over medium-low heat. Add the onion, garlic and carrots and cook for 2-3 minutes or until the onion is slightly translucent, stirring more or less continuously.
    Add the wine and cook for another minute or two or until the wine seems to have reduced by about half.
    Add the stock and the potato. Increase the heat to medium-high and bring to a boil. Then lower the heat and simmer for 15 minutes or until the carrots and potatoes are soft enough that they can easily be pierced with a knife. Don't let them get mushy, though.
    Remove from heat and purée in a blender, working in batches if necessary. (I had to add more stock so that it wasn't too thick to blend nicely)
    Be Very Careful!: When processing hot items in a blender the hot steam can sometimes blow the blender lid off. Start on a slow speed with the lid slightly ajar to vent any steam, then seal the lid and increase the blending speed.
    Return puréed soup to pot and bring to a simmer again, adding more broth or stock to adjust the thickness if necessary. Season to taste with Kosher salt and white pepper.
    Garnish with a toasted crouton and serve right away. (I didn't want to take the time to make the croutons, but they would've been pretty good, I think I'll be sure to do that next time.)

    Variations:
    • Try adding ¼ cup of minced fresh ginger along with the onions and garlic.
    • Or, after puréeing, add 1 Tbsp fresh thyme leaves before bringing the soup back to a simmer.
    • Or, stir ¼ cup hot cream into the soup just before serving. (As you can see in the picture I put a little dollop of sour cream on ours. I liked it, Ethan didn't.)
    • The soup can be thickened with rice instead of potato. Just substitute about 1/3 cup of uncooked rice for the potato, and simmer the soup until the rice is soft. (I realized when it was too late to run to the store that I had somehow run out of potatoes, so this is the method I used. If you do it this way make sure you really cook the rice well, or it's a little gritty.)
    I found this recipe here, if you're interested in checking out the original.

    Caprese Salad Skewers

    These were the appetizer course for our Valentine's Dinner. I tried to incorporate an ingredient into each dish that we'd never tried before. For this dish it was the fresh mozzarella. I like these, but they weren't as yummy as I thought they'd be. I think maybe smaller basil leaves would've helped, and I didn't really love the slimy texture of the cheese.
    These are so easy to make, all you need is:
    Fresh basil leaves
    Cherry tomatoes
    Fresh mozzarella
    Extra Virgin Olive Oil
    Balsamic Vinegar

    What you do:
    Skewer the cheese, tomatoes, and basil on a toothpick. Drizzle with EVOO and vinegar. Enjoy!

    Egg Nog Cream Pie

    My Dad's favorite dessert has been coconut cream pie for as long as I can remember, but it's not anymore. I made this a few days before Christmas and it was love at first bite. :) And, the recipe makes two pies, so you can eat it until you burst!
    What you Need:
    2 baked 9 inch pie crusts
    4 oz cream cheese (softened)
    1/2 cup confectioner's sugar
    1 tsp allspice
    1 tsp ground nutmeg
    2 cartons (one 8oz, one 12 oz) frozen whipped topping, thawed, divided (I just used one 16 oz carton and it worked out fine)
    3 3/4 cup cold egg nog
    3 pkgs(3.4 oz each) instant cheesecake or vanilla pudding mix (I used cheesecake, but it shouldn't matter)
    additional ground nutmeg
    What you do:
    In a small mixing bowl, beat the cream cheese, confectioner's sugar, allspice, and nutmeg until smooth. Fold in the 8 oz carton of whipped topping. (I did this a little at a time, since the cream cheese mixture is so thick) Spoon into the crusts.
    In a large bowl, whisk the egg nog and pudding mixes for 2 minutes. Let stand for 2 minutes or until soft set. Spread over the cream cheese layer. Top the pies with the remaining whipped topping; sprinkle with nutmeg. Cover and refrigerate 8 hours or overnight. (we didn't wait to eat our and it was still great)

    Lemon Crackle

    This is a really yummy dessert that is unlike anything you've ever had. It's a lemon pie, and a fruit crisp all at the same time. It sounds weird, but if you like lemon, you'll love this. The combination of tastes and textures is really fun!What you need:
    Crust:
    1/4 cup butter or margarine, softened
    1 cup packed brown sugar
    1 cup flour
    1/2 tsp baking soda
    1 cup flaked coconut
    1/3 cup finely crushed saltines (about 10 crackers)
    Filling:
    1 cup sugar
    2 TBS cornstarch
    1/4 tsp salt
    1 cup water
    6 TBS lemon juice
    1/2 cup butter or margarine
    2 egg yolks, beaten
    whipped topping (Optional, we never used any of this and it was still great)

    What you do:
    In a mixing bowl, cream butter and brown sugar. Combine flour and soda; add to creamed mixture with coconut and cracker crumbs. Toss with a fork until crumbly. Press half into greased 11in x 7in x 2in baking dish.
    In a sauce pan, combine sugar, cornstarch, and salt. Stir in water and lemon juice until smooth. Add butter and egg yolks. Bring to a boil over medium-low heat, stirring constantly. Cook and stir for two minutes or until thickened. Remove from the heat; pour over crust. Top with remaining crumb mixture. Bake at 325 degrees for 20 minutes. Cool. Cut into squares, and serve with whipped topping if desired.
    Store in the refrigerator.
    Makes 12-16 servings.

    Hot Cocoa Stirring Spoons


    I saw these on Pinterest and knew I had to make them. They are so easy and fun!! 

    Ingredients:
    • Spoons
    • Candy Coating (like Almond Bark which you can find in the baking aisle, or melting chips which you can find in the cake decorating aisle by the crafts--if your walmart is organized the same as ours)
    • Decorations (sprinkles, candy canes, sugar pearls, mini M&M's, caramel bits, peanut butter chips, white chocolate chips, etc.)
    Pretty much you just melt the chocolate according to package directions (you don't need to melt the whole pack at once, just a small portion) and then scoop it into the spoon (using another spoon) and decorate before it cools. Easy, fast, and fun!