New Mexico Carne Adovada

 This recipe comes from the book Tasting New Mexico: Recipes Celebrating One Hundred Years of Distinctive Home Cooking, by Cheryl Alters Jamison, Jamison Bill, and Bill Jamison


Click here to buy this book on Amazon


3 pounds pork shoulder, trimmed of fat and cut into 1 1/2 inch cubes


8 ounces whole dried red New Mexico chilies, stemmed, seeded, and rinsed

2 cups chicken or beef stock or water

1 medium onion, chopped

4 garlic cloves

2 tsp vinegar, preferably sherry or cider

2 tsp crumbled dried mexican oregano or marjoram

1 tsp ground coriander, optional

1 tsp salt, or more to taste


Preheat oven to 300*F. Grease a large, covered baking dish. Place the pork in the baking dish. 

Prepare the sauce. Begin by placing the damp chilies in a layer on a baking sheet and toasting them in the oven for about 5 minutes, until they darken just a shade. Watch chilies carefully because they can scorch quickly. Remove them from the oven, but leave the oven on. Cool chilies briefly, then break each into 2 or 3 pieces, discarding the stems and most seeds. 

Dump approximately half of the chilies into a blender with 1 cup of stock/water. Puree until you have a smooth, thick liquid but can see tiny even pieces of chile pulp suspended in it. Pour the mixture into the baking dish. Repeat with the remaining pods and stock, adding the rest of the sauce ingredients to the blender. Add mixture to the baking dish and stir the sauce together with the pork. 

Cover the dish and bake at 300*F until the meat is quite tender and the sauce has cooked down, about three hours. If the sauce seems watery, return the dish to the oven uncovered and bake for an additional 15-30 minutes. 

Serve hot, garnished if you wish with sour cream, lettuce, and tomato. 

Basic No-Knead Sourdough Bread

 This recipe comes from the book Sourdough Cookbook for Beginners: A Step-by-Step Introduction to Make Your Own Fermented Breads by by Eric Rusch and Melissa Johnson 

Click here to buy this book on Amazon


500 grams all-purpose or bread flour

350 grams water

70 grams active sourdough starter

10 grams salt (1 3/4 tsp)


Mix the flour, water, sourdough starter, and salt in a bowl with room for the dough to double in size. Cover the bowl, noting the level of the dough and the time. 


When the dough has almost doubled in size and the surface is puffy and bubbly, end the bulk fermentation. This will likely be about 8-12 hours from mixing.


Scrape the dough out of the bowl onto a well-floured surface and pre-shape it into a ball. 


Cover the dough with your inverted bowl and let it bench rest for 20 minutes. 


Flour the top of the dough and use your bench knife to flip it onto the floured side. Shape the dough into a batard or boule. (See book for shaping instructions.)


Let your shaped dough rest on its seam while you flour your proofing basket, then place the dough in the basket seam-side up. 


Cover the basket and let the dough rise for another 1-3 hours for the final proof. The dough will expand in the basket but not double in size. If you want to bake much later, you can do the final proof in the refrigerator for 10-12 hours and bake the dough directly from the cold. 


Before the end of the final proof, preheat your oven and baking vessel for 30 minutes at 500*. (See book for notes about heat limits of baking vessels.)


Flip your dough out of the basket onto a piece of parchment paper, and score the top. 


Transfer the parchment and dough to the baking vessel, cover, and return the vessel to the oven. 


Bake for 20 minutes and then lower the temperature to 450*. After another 10 minutes, take the lid off and after an additional 5-10 minutes, remove the bread from the oven. The internal temperature should be 205* or higher. 


Let the bread cool on a rack for about 2 hours before slicing. 

Erik's Garlic Knots

For Christmas, "Santa" brought Erik an awesome cookbook that is set up to make cooking with kids super easy for everyone. He is loving making all kinds of yummy new things, and for dinner tonight he chose to make Garlic Knots and Homemade Mac 'n' Cheese. It was a huge hit with everyone! If a seven year old can make these than you can too!
If you like cooking with your kids (*or aspire to like it*), you really ought to check out this book. So far every recipe we've tried has been a smashing success, and the pizza crust was easily the BEST home made pizza crust we've ever eaten.

What You Need:
1 (14 oz) container refrigerated pizza dough OR 1 ball (1 pizza's worth) of pizza dough
3 TBS melted butter
1 tsp garlic salt
1/2 tsp parsely


What To Do:
*I have rewritten these instructions to be more like a traditional recipe, but the directions in the book are designed for a child to be able to follow them with as little adult help as possible and they are amazing!

Preheat oven to 400*. Grease a large baking sheet.

Roll the dough out to about a 1/2 inch thick. Cut into 8 long strips, then cut each of those in half to make 16 pieces. Take each strip of dough and twist it a lengthwise, then tie it in a knot. Place on the greased baking sheet.

Mix the garlic salt and parsley together in a small bowl. Brush the knots with the melted butter, and sprinkle the garlic/parsley mix on top.
Bake for 8-10 minutes, or until golden brown. (Ours in the picture above might have benefited from another minute or two, but we got impatient.)

Cheesy Tacos, Two Ways

I'm always on the look-out for great LC substitutes for our favorite foods. With our love of Mexican food (specifically NEW Mexican food, but we'll take what we can get) I've been searching for ways to replace the tortillas that are nearly indispensable for this style of cooking. We have discovered some alternatives for tacos that have us feeling pretty excited, so I thought I'd share them here.
Method #1
What you'll need:
2 cups shredded cheddar cheese
Taco meat (prepared however you normally make it) *The recipe says to use 1 cup, but I think I used about 3/4 of a pound.
Toppings of choice (avocado, tomato, green onion, etc)

What to do:
Preheat oven to 400*. Cover a baking sheet with parchment paper, leaving enough on the sides that you will be able to lift the cheese from the pan.
Sprinkle cheese to cover the baking sheet with one layer (you may need more cheese). Bake for about 15 minutes, or until it bubbles and browns on top.
Remove from the oven and see if you can slide a spatula under all the edges. If you can you're ready to go on, if not put it back in the oven for another minute or two.
Spread taco meat and any other toppings over the cheese in a thin layer.
Remove from pan by lifting edges of parchment paper. Roll the cheese up like you would cinnamon roll dough. Slice into desired sized portions (the original recipe says to only make 3-4 slices, but we cut ours into small pinwheels and I think it would be easier to eat this way), top with sour cream, and serve.
Method #2
We discovered this method of making taco shells via Pinterest. The original site is here. These are more of your traditional taco shell.

What You Need:
Shredded Cheese
Your preferred taco fillings

What To Do:
Make a small circle of cheese on a glass plate (ceramic didn't work so well for us). Microwave for 40-60 seconds until the cheese is all melted and starting to brown.
Lift them carefully from the plate and hang them over the edge of a bowl or pan until they have cooled and hardened.
Fill with your favorite taco stuff and enjoy!

***For non-microwave directions check out this site.

Creamy Low-Carb Ham and Cauliflower Soup

After eating on our Christmas ham for a couple of days, I was in need of a way to use up the leftover meat. I turned to my Lazy Keto app and searched through their recipes and found this one that looked like it was worth a try. Ethan AND two of our three kids all liked it, which is close enough to perfection for me! This being the week after Christmas we were eating out of paper dishes and putting forth minimal effort in general, so I don't have a good picture for you. Sorry!
I tweaked the recipe a bit, so I thought I'd share our version of the recipe for anyone else who wants to give it a try. 

Low Carb Egg Latte

When I wrote about how our family does Low-Carb I promised to post follow-up recipes ASAP. Well, here we are four months later and I'm finally getting one of them up here! Yeah me! :) 
These Egg Lattes are my go-to breakfast, especially since I discovered Jordan's Skinny Syrups at Tuesday Morning here in Carson City. They are WAY cheaper than the Toriani ones you find in the other stores around town and come in so many fun flavors!
I adapted this recipe from this one at DietDoctor, which is dairy-free. Just in case anyone's interested in seeing the original.

Fat Bombs!

When it comes to staying on the wagon with eating Low-Carb/High-Fat, I find that having good snacks on hand is key. One easy way to beat sweet cravings and keep the munchies under control is to eat some Fat Bomb. I know, it's not exactly the most appetizing name, but these babies really do work. I often find that I'm not terribly hungry for breakfast and will wait to eat until lunch. If I get hungry before lunch time I'll grab a bite of fat bomb to tide me over.

What You Need:
8 oz cream cheese
8 oz butter
flavorings/seasonings of choice***

What You Do:
Let your butter and cream cheese come to room temperature. Put it in a mixing bowl with the flavorings of your choice and beat until fluffy like frosting.
At this point you have a couple of serving options. You can just put the whole mess in a pint jar in the fridge and scoop out a spoonful any time you feel like it. Another option is to scoop it into bite size piles on a waxed paper lined baking sheet and freeze. Store in an airtight container in the freezer and let soften for a moment before you eat it. You could also spread the mixture into an 8 in baking dish lined with wax paper, freeze until solid enough to cut, then cut into bite sized pieces and store in the freezer.

Flavor ideas:
Strawberry lemonade: lemon and strawberry extracts and sweetener of choice
Caramel Pecan: sugar-free Toriani syrup and chopped pecans (I like roasted salted ones the best!), for extra yumminess drizzle with melted dark chocolate

Living Low-Carb

Since several of us Mower ladies are trying to follow a more low-carb lifestyle, I thought I'd share some of our favorite recipes. I'd thought about typing up posts for each individual meal, but then I realized that most of them are already available online anyways so why do extra work?! So, without further ado, here are 45 of our favorite Low-Carb/High-Fat recipes.

Key:
*Favorites
^Quick/easy


Breakfast:
Eggs are the easiest LC breakfast, but I have eaten so many of those that I can barely choke them down anymore. I often skip breakfast and just have a mid-morning snack to tide me over until lunch. When I do eat breakfast, here are some things that I eat:

*^LC Latte (No coffee. I have heavily adapted this recipe to fit what I typically have on hand, for the original see here)
Breakfast Balls
LC Waffles (with whipped cream and fruit or sugar-free Toriani syrup)
Devilled Eggs
LC Pancakes (with sugar-free Toriani syrup, usually vanilla flavor)
^Blueberry smoothie (you can sub whatever kind of berries you have on hand)

Snacks:
I find that as long as I have good snacks on hand I can do pretty well staying on the LC wagon. When I'm hungry I'm most likely to give in and grab something I shouldn't, so I use these snacks for a quick boost to keep me going until I can eat a healthy meal. 

Nuts (peanuts and roasted/salted pecans are my favorite, just don't eat too many!)

*Cookie Dough Fat Bombs (this is my favorite recipe, but you can make any flavor you want by mixing equal parts cream cheese and butter with whatever flavors/sweeteners you like)

Meat and Cheese Roll Ups (yes, roll a slice of cheese in a slice of lunch meat. Add a squirt of mustard for flavor and/or a smear of mayo for extra satiety.)

Pepperoni Slices
String Cheese


Lunch:
For lunch most days we eat a salad with lots of toppings. I typically buy a head each of iceberg and romaine lettuce, as well as a bunch of spinach. Chop it all up and it will stay good in the fridge all week for lunches and sides for dinner. If I'm not eating a salad I'm probably eating leftovers or some tuna with mayo on some LC crackers.
To make our salads nice and filling we try to add as much fat as possible while keeping the carbs down to a minimum. Some salad toppings we like are:

Sunflower seeds
Olives
Pepperoni
Sliced lunch meat
Leftover meat from dinner the night before
Cheese (mozzarella, cheddar, Parmesan, a pinch of feta, whatever we have and sometimes a bit of each)
Fried Spam (diced)
Bacon Bits
Peanuts
Roasted pecans
Sliced green onions
Slivers of bell pepper
Tomato
Avocado
Boiled Egg, diced
Cucumber Slices


Dinner:
While Breakfast and Lunch tend to be along the lines of the Standard American Diet for our kids, the whole family eats Low-Carb at Dinner. Instead of trying to make up for the bulk that we lose when we ditch the carbs, we focus on finding ways to get fats into our meals to fill us up instead. 
Here are 30 of our favorite dinner recipes:

*Savory Chicken Sandwiches on Oopsie/Cloud Bread
^LC Pizza (This crust tastes okay fresh and hot, but is most like a real pizza crust the day after. You can also use fat-head dough for the crust.)
^LC Tex-Mex Casserole (I sub diced green chili for the Jalapenos, but it's up to you)
Pesto Chicken Casserole (just go a little light on the Feta, maybe only use 3/4 and save the rest to go on salads)
^LC Burgers over a pile of lettuce
*SW Hassleback Chicken
Hamburger Gratin (we're not big fans of Brussels Sprouts around here so we sub in some cubed butternut squash)
Pulled Pork and *Coleslaw
Shredded Chicken Tacos 
Cheesy Taco Skillet
Stuffed Zucchini 
*^Cheesy Chicken Skillet Dinner
Oven Chicken Cordon Bleu
Tacos in LC Taco Shells or on Fat-Head Dough fry-breads (bake first, then fry)
*LC Pork Picatta
*Rosemary Balsamic Pork Cutlets
Parmesan Chicken (bread with Parmesan, almond flour, salt/pepper, and Italian seasoning)
^Pork Chops in Red Pesto
*Chicken in Creamy Parmesan Sauce with Sundried Tomatoes
Creamy Honey Mustard Chicken
Baked Eggs (could also be a breakfast option)
*^Keilbasa and Cabbage
Egg-Roll Stir-Fry
^*Chicken Stir-Fry Sheet Pan Meal
*Creamy Lemon Chicken Picatta (sub almond flour in the breading)
One Pan Balsamic Chicken and Veggies
Chicken Lazone (skip the pasta, eat a salad or serve over veggies)
Creamy Cauliflower and Leftover Ham Soup
*Low-Carb Zuppa Toscana
Lasagna with Ham "noodles"


Side Dishes:
I will admit that the area that lacks the most variety in our Low-Carb life is our side dishes. We eat lots of broccoli and cauliflower, and I'm trying to branch out and find yummy new ways to cook different veggies. So far here are some that we've liked:

Roasted Summer Squash
Baked Parmesan Zucchini
Roasted Cabbage Steaks
^Cauliflower Mash
*LC Coleslaw
Roasted Butternut Squash (sprinkle with Parmesan after it's cooked)


Sweet Treats:
We don't make treats very often anymore, but sometimes you just can't shake the cravings and need a good way to satisfy them without falling off the wagon. Typically when this happens I grab a handful of salted peanuts and a handful of semi-sweet chocolate chips to munch on. If I want to put in a bit more effort here are some other yummy things we've made:
Low Carb Chocolate Mousse
Chocolate Brownie Mug Cake


Roasted Butternut Squash Soup


 We harvested about half a dozen butternut squashes out of our garden this year, and they are so yummy! My favorite way to eat them is cubed and roasted, they're SO good! I was looking for a way to mix things up an found this recipe for butternut soup. It looked easy and yummy, so I went for it, making a few little tweaks to the recipe here and there. The instructions seem long, but this is not a complicated dish and comes together in an hour or less, even if you have three kids hanging on you or otherwise demanding your attention while you make it (see bonus step).


 What you Need:

- 1 medium butternut squash, peeled, de-seeded, and diced into 1/2 in cubes
- oil (I used canola, but you could use olive oil, or vegetable oil, or whatever you have)
- herbs/spices of choice (I used Herbes De Provence, other possibilities are an Italian herb blend, or ginger and curry)
- 2 medium potatoes, peeled and diced into 1/2 in cubes
- 1 large carrot, peeled and sliced into 1/2 in slices
- 1 onion, cut into 8 wedges
- 1 head of garlic
- 1 tsp celery seed
- Salt and pepper to taste
- 3-6 cups chicken stock or broth
- milk (optional)
- sour cream (for garnish, optional)

 What you Do:

Basically all you have to do is roast all the veggies, throw everything in the blender, warm it up, and serve. Just in case you want more detail than that, here you go...

1. Preheat oven to 375 degrees. 
2. Prepare your garlic head for roasting by slicing the top of it off and drizzling some oil over it. If you have no idea what I'm talking about, here are some better instructions. Wrap in tinfoil and place in the oven. You want this to cook as long as possible, so get it in first and make sure it's the last things you pull out when they're all done. 
3. Put your squash cubes in a bowl, drizzle with a 1-2 TBS oil and sprinkle with herbs of choice and salt/pepper. Toss with a spoon so your cubes are evenly coated in oil. Spread in a single layer on a sheet pan. The goal is to use enough oil that all the surfaces on the squash cubes end up with a light coat of oil, but not so much that you have a puddle of oil in the bottom of the bowl after you toss the squash.
4. Working with one veggie type at a time, follow the same instructions as in step 3 for the potatoes,  onions (toss these gently so the layers don't fall apart), and carrots, EXCEPT don't put the herbs on them; just oil, salt, and pepper. I kept my veggie types separate in case the roasting times were different and I needed to pull something out of the oven before the rest were done.
5. Place sheet pan in oven. Roast for 15 minutes. Using a spatula turn all the veggies over and put back in to continue roasting. Check every ten minutes for doneness by stabbing with a fork. If the veggie is soft and easy to pierce then it's done. All of mine were done about the same time, but if yours aren't just take what's done off the pan and put the rest back in.

6. When all your veggies are tender and the smell is so amazing you're about to lose your mind, remove them all from the cookie sheet (Remember that bowl you used to oil them up? It works great to store them all in for a few minutes). While you want some yummy browning on your veggies, if you have any little bits that seem too burned (some of my onion layers got a bit overdone), make sure to discard those. Place the sheet pan over a stove burner turned on to low heat, and pour in a small amount of chicken broth (1/2 cup?). Cook and stir, scraping all the yummy caramelized brown bits off the bottom of the pan. Once you have gotten all the good stuff stirred in, take it off the heat, and pour the goodness into your blender.
7. Remove your garlic head from the oven and unwrap the foil so it can cool enough to work with. You can turn your oven off now.
***Bonus step: Extricate your 5 year old from the exersaucer:
 8. Dump your veggies in the blender, along with the celery seed and enough chicken broth/stock to cover everything. If you want a silky smooth soup add them all now, but if you want a bit of texture than reserve a handful of squash cubes. Pulse a few times to break up most of the big chunks, stirring and adding more broth (or milk for added richness) as necessary. Your garlic is probably cool enough to handle now, so squeeze the roasted garlic out of the skin and add those to the blender. Blend until smooth, adding more liquid if desired. If you saved some squash for texture, add those now and pulse until desired texture is reached.
9. If blending your soup has cooled it too much to serve, warm it up in a pot on the stove. Serve with a dollop of sour cream if desired (yum!).

Calzones

I will admit to never having had a calzone before I made these, but I'm so glad I did! I found this recipe in my favorite Betty Crocker cook book and just had to give it a try. These are pretty easy to make and SO yummy. You can fill them with whatever you have handy and you've got a really yummy dinner ready to go. This filling recipe came from my Betty Crocker cookbook, but we've also used cottage cheese (instead of ricotta), pepperoni, sausage, and pretty much anything else you might put on pizza). Here's a whole page of ideas for ways to make this yummy dinner treat your own. 
What you Need (crust):
2 1/2-3 cups all-purpose flour
1 TBS sugar
1 tsp salt
1 pkg regular dry or quick active dry yeast (2 1/4 tsp)
3 TBS olive or veggie oil
1 cup very warm water (120-130 degrees F)

What you Need (filling):
2 cups shredded mozzarella cheese (8 oz)
1/4 lb salami, cut into thin strips
1/2 cup ricotta cheese
1/4 cup chopped fresh basil leaves
2 roma tomatoes, chopped
ground pepper
1 large egg, slightly beaten

What you Do (crust):
In large bowl, mix 1 cup of the flour, the sugar, salt, and yeast. Add oil and warm water. Beat with electric mixer on medium speed 3 minutes, scraping bowl requently. Stir in enough remaining flour until dough is soft and leaves sides of bowl. Place dough on lightly floured surface. Knead 5-8 minutes or until dough is smooth and springy. Cover loosely with plastic wrap and let rest 30 minutes. (At this point you could just use this dough to make pizza, but why stop here when you could make calzones?)

What you Do (calzones):
Heat oven to 375 degrees F. Grease 2 cookie sheets.
Divide dough into 6 equal parts. On lightly floured surface, roll each part into 7-inch circle with floured rolling pin.
Top half of each dough circle with mozzarella cheese, salami, ricotta cheese, basil and tomatoes to within 1 inch of the edge. Sprinkle with fresh ground pepper. Carefully fold dough over filling; pinch edges or press with fork to seal securely.
Place calzones on cookie sheets. Brush with egg. Bake about 25 minutes or until golden brown.

We like to warm up some marinara (or whatever pasta sauce we have handy) and serve it as a dipping sauce. YUM!

Balsamic Glazed Rosemary Pork Cutlets

These were SO yummy, they taste like something you'd pay good money for in a restaurant. They were also really quick and easy to make! We ate ours with baked potatoes and some fruit cocktail (fancy, I know) and they made a great dinner. I found the recipe here.

What you need:
2 tsp oil
1 TBS rosemary leaf, chopped
1/2 cup chicken broth
1 lb pork tenderloin, cut crosswise into 1/2 inch thick slices
1/2 tsp salt
1/8 tsp pepper
1/4 cup balsamic vinegar
2 TBS honey

What you do:
Heat oil in a large nonstick skillet over medium heat. While that is warming up, sprinkle the cutlets with rosemary, salt, and pepper. 
Add the pork to the pan and cook about 3 minutes per side, or until done. Remove from pan and keep warm. 
Combine broth, vinegar, and honey, stirring with a whisk. Add to the pan. You want to scrape the bottom of the pan to get all the yummy browned bits from the meat stirred in. Bring to a boil.
Reduce heat to low and simmer for 6 minutes, or until reduced to 1/3 cup and is thick as syrup. While the vinegar is cooking down, it smells pretty strong. Ethan walked in during this time and asked what the heck I was doing with all the vinegar. I told him it was dinner, and you could tell by his face that he wanted to refuse to have anything to do with whatever I was cooking, but he wisely bit his tongue. He didn't regret that decision. 
Once the sauce is reduced and thickened, return the pork to the pan and cook until heated through.


I thought I'd share my favorite trick for speeding up the cooking time for baked potatoes. It's fine to bake potatoes for an hour when you've also got meatloaf or something baking that is going to take just as long, but I hate running the oven for that long when the rest of dinner's only going to take 20 minutes. So, I heat my oven up to at least 400. Scrub the potatoes, and slice in half lengthwise. Carefully score the potato (see above picture), being careful not to cut through the peel. Sprinkle with salt and pepper (also yummy to add garlic or onion powder, or whatever herbs would complement your main dish) and put a few dabs of butter on top of each potato half. 
Bake on a baking sheet until cooked through and enjoy! 

Cigares au Chocolat


I recently tried out a french recipe I found online. Making the conversions and figuring this out took a few tries, but I finally got it! These cookies are super yummy and once I had the right amounts and consistency figured out, they weren't too hard! I used a post on butterbaking.com to help me figure out my conversions (it was incredibly helpful!). Here's my Americanozed version of the original recipe.

Cookie Ingredients:

7 TBS of soft butter 
3/4 c + 1 TBS + 1/4 tsp powdered sugar (or a heaping 3/4 c.)
1/2 cup + 3 TBS + 1 1/2 tsp flour (or a scant 3/4 c.)
2-3 eggs worth of egg whites
Room temperature water
Chocolate or dark chocolate (I used 2 1/2 squares of almond bark, so maybe 3/4-1 c. chocolate chips worth)
Something to roll the cookies on (I used a pen).

Filling Ingredients:

1 oz cream cheese
2 TBS powdered sugar
1/4-1/2 tsp cocoa powder*
2 large spoonfuls of melted chocolate*
2 TBS caramel syrup*

small amount of cocoa powder for dipping the end

*Choose whatever flavors you want for the filling. Raspberry would be yummy in this too!


Directions:
  1. Mix together the butter and powdered sugar for 2 minutes. Mix in the flour, then add the egg whites one at a time. Mix until smooth. If your mixture looks like the picture below, it's too thick:

    Add water, 1 TBS at a time until the mixture is just thin enough to pour. Chill for at least 2 hours. 
  2. Preheat the oven to 400 F. Place parchment paper on a cookie sheet and spray with Pam. Using a spoon, pour 2 1/2 to 3 inch circles of batter on the prepared parchment paper. Only pour 4 cookies at a time (more than that will not give you time to roll them before they have cooled and hardened). Bake for 5-6 minutes. The edges will be golden brown. 
  3. Upon removing the cookies from the oven, immediately roll them around the pen (or whatever round object you're using) so there is a hollow in the center. Place them to the side to cool. If they try to unroll, place them with the "flap" on the bottom and brace them on either side (I put a cup on either side of the cookies that wanted to unroll, which was only a few of them really, you won't have to do this with all of them hopefully). Let the cool and set up. 
  4. Mix the filling ingredients until smooth. Scoop into a plastic bag, cut the corner, and squeeze the filling into the cooled cookies.
  5. Melt the chocolate according to package instructions. I added about 1-2 tsp of shortening to my melted chocolate to make it a little more smooth and thin. Place a small pile of cocoa powder to the side. Dip half of each cookie in the chocolate and gently tap off the excess chocolate. Dip the end in the cocoa to resemble ash. Place on a flat surface to cool (I let mine cool on the now cool pan/parchment paper). 

These were a gift for a friend who loves cigar boxes, so I found a fun cigar box at the local Antique Mall, cleaned it out, and used it at the gift box for the cookies. The cookies don't look exactly like cigars, and they don't look as good as the original cookies on the French site, but they tasted amazing and were a lot of fun to make!


Pirate Theme Snacks


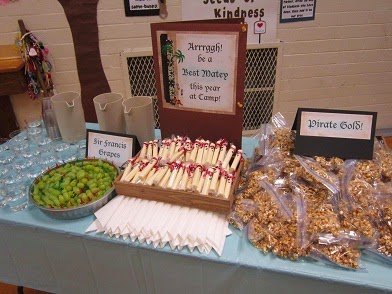
This last Saturday I had the assignment to provide snacks for 100 people for our stake camp clinic. Our camp theme is "Embark" this year and each unit has a theme ship. Our YCLs ship is The Black Pearl, so I used the theme of pirates for the snacks. The menu was cheese sticks, grapes and carmel corn with water to drink. The sign says: "Aarggh! Be Best Mateys This Year at Camp! It worked very well. At least the girls thought it all was cute. Naturally there were a few fingertip sword fights with the plastic picks.

Thanks to Marquette and Cameron for naming the grapes! One can always go to them for a cute idea.


Spicy Prickly Pear Glazed Chicken


I found a recipe online that sounded good, but it made 24 chicken thighs and used bourbon, which we don't have and didn't want to figure out what to do with the extras. I wanted to make this in much smaller portions and leave the bourbon out so I used the recipe as my base and then tweaked it. This turned out really really yummy! It was incredibly moist and tender and the sauce was perfect. I sautéed some canned green beans to go with this and tasted excellent with the sauce as well. Here is how I made it:

Spicy Prickly Pear Glazed Chicken:

Ingredients:

  • Olive Oil
  • 1/2 chopped red onion
  • 2 seeded and chopped serrano chile (use more to give this more kick, or less for a more mild kick. 2 chiles gave it just barely a detectable pinch of spice without making this too hot)
  • 2 cloves garlic, minced
  • 1 tsp ground cumin
  • 1/2 tsp ground coriander
  • juice from one lime (not key lime!)
  • zest from one lime
  • 2 TBS Worcestershire sauce
  • 1/4 c. red wine vinegar
  • 3 TBS brown sugar
  • 1 1/2 c. prickly pear juice
  • 1 tsp salt
  • 4 TBS butter
  • 6 Chicken thighs (we used boneless, skinless)
  • Chopped cilantro as garnish

Directions:

  1. In a sauce pot, heat the oil. Saute the onion over medium heat until browned. 
  2. Add the chile and garlic and saute until softened. 
  3. Add the cumin and coriander and cook for 2 minutes. 
  4. Add the lime juice and zest, Worcestershire sauce, red wine vinegar, and brown sugar. Bring to a boil for 5 minutes. 
  5. Transfer the mixture to an electric blender and puree until smooth. Return the mixture to the pot. 
  6. Add the prickly pear juice, salt, and butter. Return to a boil. Cook until the mixture has thickened. You almost want a paste, but not too gummy. 
  7. In a large resealable bag, combine the thighs with 1/3 of the sauce. Toss to cover and refrigerate for at least 2 hours. 
  8. Preheat the oven to 375. 
  9. Lightly oil a baking pan (or I just lined mine with tin foil). Lay the thighs in the pan, and brush 1/2 the remaining sauce over the top.
  10. Bake for 25 minutes. 
  11. Turn the thighs over and brush on the remaining sauce. Bake for 20 minutes. 
  12. Broil the thighs for 3-4 minutes to finish off. 
  13. Top with cilantro

Peanut Butter and Yogurt Fruit Dip

I had this for the first time yesterday at our weekly play group. One of the other moms brought this to share with everyone and it was SO yummy! It's really easy to make and so good!

What you need:
1/2 cup plain yogurt (I used greek yogurt, which has half as many carbs and twice as much protein)
1/4 cup peanut butter
2 TBS honey
1/4 tsp cinnamon

I actually just kinda guessed at the amounts when I made this. The lady who brought this to play group told me the ingredient list but I didn't ask how much of each. You can adjust any and all the these ingredients until it tastes yummy to you. 

What you do:
Warm up the Peanut Butter and the Honey. I used a small pan on my stove top but a microwave would work great too.
Add all the ingredients together and stir until well mixed.
Serve with apples or anything else you might like (we also tried graham crackers and that was yummy too). This makes enough for 1-2 apples, depending on how big the apple and how much you pile on each bite.  :)

Brownie Baked Oatmeal


3 cups oatmeal (quick or rolled oats)
2 teaspoons baking powder
1/4 teaspoon salt
1/4 cup cocoa powder
1/2 teaspoon cinnamon
1/3 cup brown sugar - make it a scant 1/3 cup
2 tablespoons olive oil
1/2 cup applesauce
1 cup milk
2 eggs
2 teaspoons vanilla

Preheat oven to 350 degrees. Whisk together the dry ingredients in a large bowl. In another bowl, whisk together wet ingredients. Mix together. Pour batter into a well greased 9x13-inch baking pan. Bake for about 20 minutes, or until toothpick comes out clean. Serve with milk.

I like to serve it with sliced bananas and soft whipping cream. Garnish with toasted coconut.
Truly, it is yummy!

I first saw this recipe on Pinterest - the link took me to Rachel's recipe at thrivinghomeblog.com and I adjusted it from there. Thanks Rachel! I'm sure you all are going to enjoy it - Kathleen

(many thanks to Marquette for the pretty pics.)


Fun Santa Pancakes


These were so simple to make and cute! Just use regular Bisquick pancakes, spread some raspberry jam across the top part to resemble a Santa hat and squirt the pressurized whipped cream for the fur around the hat and Santa's beard. A maraschino cherry makes the nose. We didn't do eyes, but I imagine a couple of chocolate chips would work. I was happy with the way these turned out and they were tasty besides! An easy Christmas win!

Peppermint Cake Batter Truffles

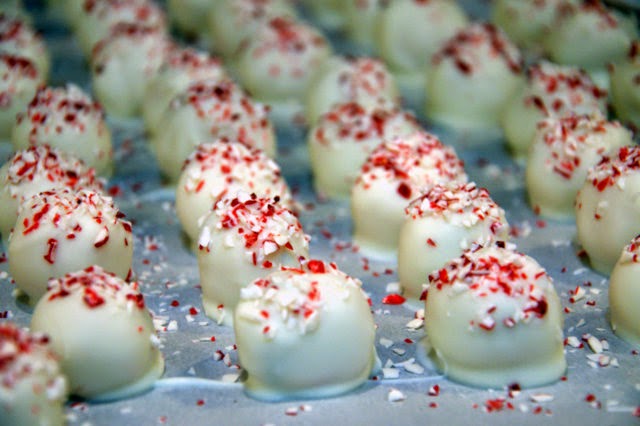
I took a recipe I found on Pinterest and "Minterized" it to fit the holidays better. I turned confetti cake batter truffles into Peppermint Cake Batter Truffles.


Ingredients:

  • 1/2 c. (1 stick) unsalted butter
  • 1/2 c. white sugar
  • 1 c. white cake mix
  • 1 1/2 c. flour
  • 1/8 tsp salt (omit if using salted butter)
  • 1 tsp peppermint extract
  • 1/2 tsp vanilla (optional)
  • 3-4 TBS milk
  • sprinkles (optional)
  • 1 pkg vanilla/white almond bark or white candy coating
  • crushed mint candies for topping


Directions:

  1. Cream the butter and the sugar until mixed well. 
  2. Add the cake mix, flour, salt, and extracts and mix thoroughly. 
  3. Add in the milk 1 TBS at a time until the mixture reaches a doughy consistency. Add in the sprinkles. It will be slightly sticky, but still be able to be rolled into balls. 
  4. Roll the dough into one inch balls and place in the freezer for about 10 minutes to firm up. 
  5. While dough is chilling, melt coating as per directions on the package. If using a 2lb block of almond bark, I usually use 2/3 of the block. If needed, add 2-4 TBS of shortening to the candy coating to make it more smooth and thin. 
  6. Prepare a pan with waxed paper or parchment paper. 
  7. Dip the truffle balls in the candy coating. I usually drop 2-4 balls in the coating at one time, and then I scoop them out one at a time with a fork to help drain off the excess coating. Place on the papered pan. Immediately sprinkle with crushed peppermint candy (you must do this before the coating sets!). 
  8. Allow a few minutes for the coating to set. 
  9. These are great freshly made, but are especially good after a few hours when the flavors have had a chance to mix and meld. 

Cherries Jubilee

I joined a book club with some of the ladies from church and it was my turn to host the book. With the chaos of holidays we needed a quick and easy book and the first one that I could think of was "Dealing with Dragons" by Patricia C. Wrede. In the book Cimorene makes Cherries Jubilee for the dragon Kazul a few times, so I thought that it would be fun to make cherries jubilee for the book club meeting. I read quite a few recipes and ended up combining elements from a number of recipes that sounded the most tasty, and I dropped the flambe aspect. I want to try the flambe sometime, but this one wasn't for a flashy presentation so I left it out. Here is the Cherries Jubilee I came up with:
Cherries Jubilee atop Cherry Cha Cha base

Ingredients:

  • 2 TBS butter
  • 1 lb. ripe cherries
  • 1/2 c. sugar
  • 1 tsp cinnamon
  • 1/2 tsp orange extract
  • 1-2 TBS water
  • pinch of salt
  • 2 TBS cornstarch


    Directions:
    1. Pit the cherries. I don't have a cherry pitter so I found a stiff straw (from one of Darrow's sippy cups) and used it to push the pits out. It worked really well actually. I also read that a small cake decorating tip can be used the same way. 
    2. Melt the butter in a large skillet. 
    3. Add the pitted cherries and "saute" for just a minute. 
    4. Add all remaining ingredients, with the cornstarch being last. Sprinkle the cornstarch over the mixture rather than just dumping it in. 
    5. Cook over medium heat until the juices have thickened to your liking.
    6. Serve with vanilla ice cream, cake, cheesecake, or (as pictured above) Cherry Cha Cha and use these as the cherries! 
    This was so yummy. I love the flavor. Not too sweet at all. Mmmm. We'll be making this one again!


    Cherry Cha Cha

    Pictured without the cherry topping
    This is a great no-bake cheesecake-like dessert and is great plain or with toppings.

    Ingredients:

    • 1/3 c margarine (the original recipe called for 1/4 c. and I found that wasn't enough to hold the crust together at all)
    • 1 1/3 c. graham cracker crumbs
    • 1/4 c. sugar
    • 4 oz cream cheese
    • 1 c. powdered sugar
    • 1/2 tsp lemon juice
    • 1 small instant vanilla pudding
    • 3/4 c. milk
    • 1 small container Cool Whip (I didn't have Cool Whip on hand, but I did have packets of Spiffy Whip, so I made one of those instead)
    • 1 can cherry pie filling
    Directions:
    1. Melt margarine in an 8x8 casserole dish or 9" pie pan. 
    2. Add graham cracker crumbs and sugar into the butter, and press into the bottom of the pan to form a crust. 
    3. Cream together the cream cheese, powdered sugar, and lemon juice. 
    4. In a separate bowl mix the vanilla pudding with the milk. 
    5. Fold into the cream cheese mixture. 
    6. Fold in the Cool Whip. 
    7. Spoon into pan over crust. 
    8. Top with cherry pie filling; chill.